
Welcome to the third part of the
dynamic hair tutorial, by me, if you have not checked out part one, two or three of
the tutorial, check it out here: PART 1, PART 2, PART 3.
Quick overview of parts 1 thru 3:
made mesh for rig
made joint system to control mesh
made dynamic curves to control the joints
made hairSystem drive the dynamic curves
made collision spheres for the hair curves
create a simple control (NURBS curve) system to control the head and collision spheres
As I said in Part 3, I am going to dedicate this post to the creation of the FK control for the dynamic hair (at least I will show you how I did it).
This can get kind of confusing and technical, if I left it there for a week or two I might get rusty with the details, thus breaking the rig. So I am doing this for whoever wants to learn from me and for me to remember and also to get critics on how can I improve this (or another way to get this done).
Exposition:
It started out as a theory as I followed the control hierarchy (who controls who) when a friend of mine asked for some help with dynamic hair. What started off on the whiteboard became a reality in Maya itself, and I wanted to share this knowledge with those who wanted to learn. Now that the exposition is done, we shall continue.
Next, a few things to take note about my naming conventions because there seem to be a lot of confusion in explaining things with the names (it even confuses me too).
hairSystem = hairSystem
input of dynamic nurbsCurve = inputCurves
output dynamic nurbsCurve (the ones that move) = outputCurves
dynamically driven joints = dynHairJ_01 (numbers vary)
groups = denoted with a _GRP
groups to be constrained = PARENT_GRP or ZERO_GRP
(ran out of vocabulary, difference will be explained later)
controls = denoted with a _CTRL
skinned joints = denoted with a _skinned
Here is a picture that I made in Photoshop (should have done it in Illustrator) to cover the whole system, it might be useful to those who are more of a visual learner.

You might find something peculiar about my own setup as I continue the tutorial, like there is a missing group in this diagram. Yes, there is a group that is missing from this diagram, which is the CTRL_GRP, it is mainly a group tat I place above my controls (CTRL) to orientate the manipulator of the controls (CTRL) in the direction of itself.
Tutorial here
As explained, doing the group thing keeps values off active controller curves while keeping them in the correct orientation. I did not want to put them inside the flow chart because that will clog up the thing.
With the overall flow chart of the system done, I shall be talking about it in words.
(You can skip this section if you want)
1. You have your hair system here, the dynamic hair is already simulated.
2. The moving hair curve will be controlling the hair joints through the IK Spline.
3. The dynamic hair joints will be controlling the hair groups.
4. The hair groups contain another group which will be controlled by the upper control through a parent constraint.
5. The translations and rotation values will displace and turn the controller that will control the skinned joint that is the child of it.
6. The skinned joint is skinned to the hair mesh and cause the hair to move as well.
OK, now with the theory of it done, I shall proceed with the step by step tutorial of the setup.
First (you would have noticed I do not continue with second or third), get your file ready, either your own file or the file I provided on here:
Now that you have your file open, create an overlaying/overlapping joint chain of the dynamic chain that you have.

Then next would be the controls, you might want to go through the tutorial about the orienting of the controls.

This part you can go either way, either re-skin the mesh to the overlapping joints and the start of the branch to the dynamic joints or re-skin later after the connections are done, where you have to skin selected joints.
I personally prefer the second way since I like to get my rigs fail proof before skinning anything. I am going to show the skin first and the skin last parts as their respective sections.
(special sections will "*")
1. Detach skin from the mesh.

*1.5. (If you want to skin first) Skin the needed joints.*
2. Unparent the joints of the overlapping joint chain (the one in blue)

3. Follow the flow chart and arrange the groups that controls the controllers as they are on the right side of the flow chart.

4. Constraint the the respective stuff according to the flow chart (right side of flow chart first)

5. Constraint the the respective stuff according to the flow chart (left side of flow chart now)
5 Optional Step. Create an attribute to hide all the unneeded stuff to be touched on.
5.5. (If you chose to skin the mesh last), skin the mesh.
6. Enjoy your new dynamic hair with FK controls that can control the hair, after the simulation.
Quick overview of parts 1 thru 3:
made mesh for rig
made joint system to control mesh
made dynamic curves to control the joints
made hairSystem drive the dynamic curves
made collision spheres for the hair curves
create a simple control (NURBS curve) system to control the head and collision spheres
As I said in Part 3, I am going to dedicate this post to the creation of the FK control for the dynamic hair (at least I will show you how I did it).
This can get kind of confusing and technical, if I left it there for a week or two I might get rusty with the details, thus breaking the rig. So I am doing this for whoever wants to learn from me and for me to remember and also to get critics on how can I improve this (or another way to get this done).
Exposition:
It started out as a theory as I followed the control hierarchy (who controls who) when a friend of mine asked for some help with dynamic hair. What started off on the whiteboard became a reality in Maya itself, and I wanted to share this knowledge with those who wanted to learn. Now that the exposition is done, we shall continue.
Next, a few things to take note about my naming conventions because there seem to be a lot of confusion in explaining things with the names (it even confuses me too).
hairSystem = hairSystem
input of dynamic nurbsCurve = inputCurves
output dynamic nurbsCurve (the ones that move) = outputCurves
dynamically driven joints = dynHairJ_01 (numbers vary)
groups = denoted with a _GRP
groups to be constrained = PARENT_GRP or ZERO_GRP
(ran out of vocabulary, difference will be explained later)
controls = denoted with a _CTRL
skinned joints = denoted with a _skinned
Here is a picture that I made in Photoshop (should have done it in Illustrator) to cover the whole system, it might be useful to those who are more of a visual learner.
Tutorial here
As explained, doing the group thing keeps values off active controller curves while keeping them in the correct orientation. I did not want to put them inside the flow chart because that will clog up the thing.
With the overall flow chart of the system done, I shall be talking about it in words.
(You can skip this section if you want)
1. You have your hair system here, the dynamic hair is already simulated.
2. The moving hair curve will be controlling the hair joints through the IK Spline.
3. The dynamic hair joints will be controlling the hair groups.
4. The hair groups contain another group which will be controlled by the upper control through a parent constraint.
5. The translations and rotation values will displace and turn the controller that will control the skinned joint that is the child of it.
6. The skinned joint is skinned to the hair mesh and cause the hair to move as well.
OK, now with the theory of it done, I shall proceed with the step by step tutorial of the setup.
First (you would have noticed I do not continue with second or third), get your file ready, either your own file or the file I provided on here:
 |
| I edited the file a little to match the names of the dynamic joints. |
Then next would be the controls, you might want to go through the tutorial about the orienting of the controls.
This part you can go either way, either re-skin the mesh to the overlapping joints and the start of the branch to the dynamic joints or re-skin later after the connections are done, where you have to skin selected joints.
I personally prefer the second way since I like to get my rigs fail proof before skinning anything. I am going to show the skin first and the skin last parts as their respective sections.
(special sections will "*")
1. Detach skin from the mesh.
*1.5. (If you want to skin first) Skin the needed joints.*
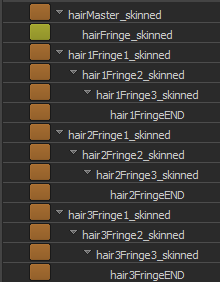 | |
| This shows all the joints that I binded. |
2. Unparent the joints of the overlapping joint chain (the one in blue)
3. Follow the flow chart and arrange the groups that controls the controllers as they are on the right side of the flow chart.
4. Constraint the the respective stuff according to the flow chart (right side of flow chart first)
5. Constraint the the respective stuff according to the flow chart (left side of flow chart now)
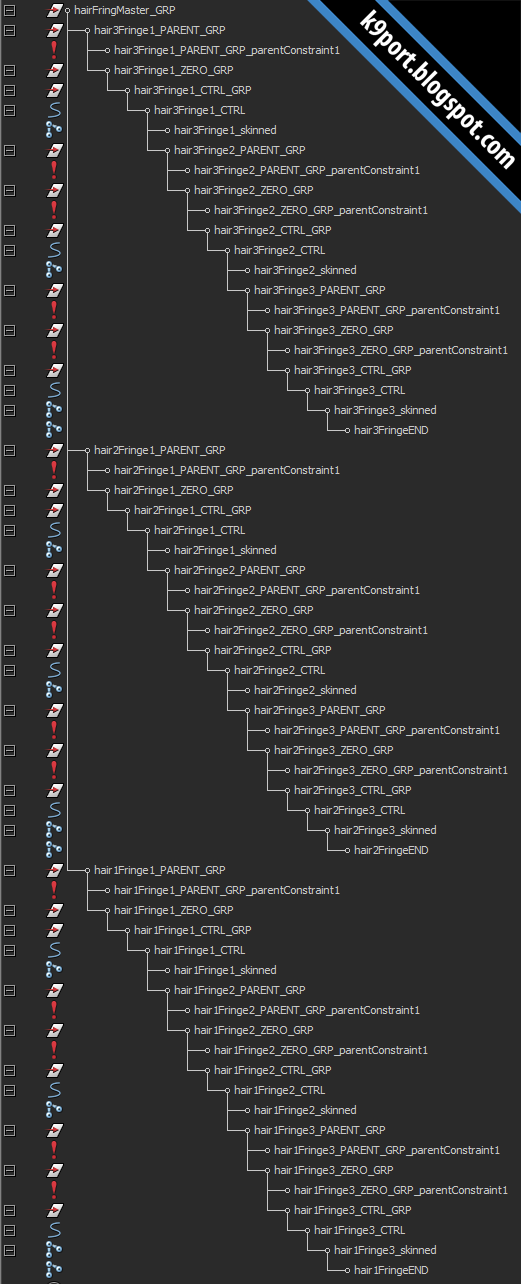 |
| Yep, it is getting larger and larger. |
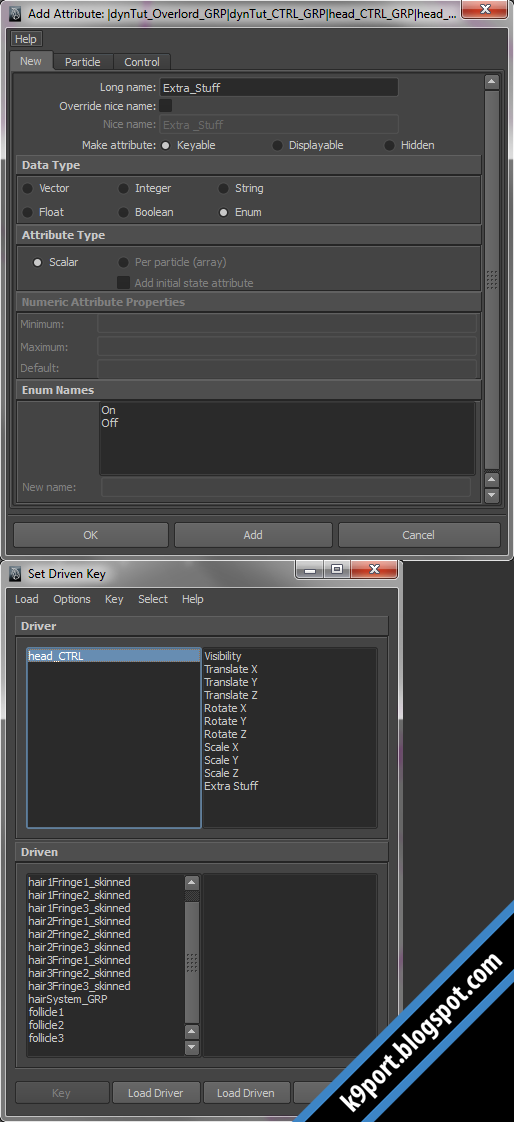 |
| Key the visibility of the items. |
5.5. (If you chose to skin the mesh last), skin the mesh.
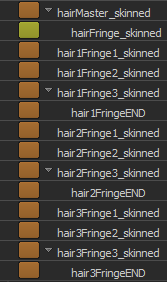 |
| Though it may look like this, it is totally fine, unless you have other plans. |
6. Enjoy your new dynamic hair with FK controls that can control the hair, after the simulation.
I actually had to enlarge (scale) the controllers because they were too small and hidden inside my hair mesh.
 |
| Final file for your reference. |
Hope you really enjoyed this ride with me through the tutorial, I hope that we all learn something from it. That is all for the Hair Dynamic tutorial folks!