Thursday 26 December 2013

Merry Christmas!!

Actually I do not celebrate Christmas, however I do celebrate the holiday.

This is a holiday post, I will tell you what I have been working on lately but no pictures, so sorry.

First up, I have been working on the Part 4 of the Dynamic Hair tutorial, going to be about the FK system on the system.

Secondly, I have been doing a lot of nCloth for my FYP (final year project), making skirts, sleeves and blankets.

Thirdly, I have been watching Breaking Bad, pretty cool show with chemistry involved, I studied chemistry in my Secondary school. I finished season 1 only though, will be watching more as the days come.

Fourth, and I think this will be the last, I've been Warframe-ing with my school pal, through the night. Great bonding session I'd consider it.

Well. that's about it, hope you had enjoyed your holidays!!

Monday 16 December 2013

Dynamic Hair Tutorial Part 3 (Collisions and hair settings)

Welcome to the third part of the dynamic hair tutorial, by me, if you have not checked out part one or two of the tutorial, check it out here: PART 1, PART 2.

In part 1, we have gone through setting up the mesh needed (skinned to joints) for a dynamic hair simulation, and also went through the setting up of curves for the dynamic hair system.

In part 2, we have gone through the connections, connecting the curves and joints and the mesh.

In this part 3, we will be going through setting up the collisions of the hair curves and some of the more important settings (that I felt was) of the hair system.

Please make sure you have your part done file that you used for the previous tutorial.

To start off, load up your file (if you have closed it) and check that you have the following items from the previous tutorial:

 In the GEO_GRP:
Mesh (model/object)

In the Rig_GRP:
Joint chain (skinned to mesh)
Hair follicles (in the master joint)

inputCurves (child of their respective hair follicles)

 In its own hairSystem_GRP:
Output hair curves (not the same as the original curves)
Hair systems


 For this lesson, all you need are the curves (either inputCurves or your outputCurves, pick one), and go to: Hair>Create Constraint>Collide Sphere

Do take note creating collide spheres/cubes (whichever suits your needs) you can only select a curve at a time and have a collide sphere/cube for a curve. However. you can have more than 1 constraint to a curve.


What it does is that it creates a sphere that collides with the hair NURBS Curve that was simulated. When created it will be at the center of the curve that you have selected on default. You can scale and reposition the collide sphere to anywhere you want the curve to collide into.

Rescaling of collide sphere.
A better perspective of the collide sphere following the curvature of the curve.
One useful way is to place it at the end (or if you want a very silky and flowy hair that bends a lot, you can have it go along the curvature of the curve) to prevent the hair from penetrating into the head.

So do all the collide spheres for all the curves and...

You should get something like this.
You can also create multiple collision spheres/cubes for one curve, like I did above.

Parent the constraints under the master joint (or any control in the rig that controls the master joint) because you want the collide spheres to move with the head and not stay there when the head moves.

I made a controller and a head joint (supposedly I followed how I would have rigged a full character [but then again the mesh is pass the origin on the negative side {for tutorial purposes only}]. I have provided a full expansion view of my outliner, just for you to check and if you have any questions, you may comment or send me a mail.


Your final result, without messing around with the hairSystem would be something like this:


As you can see, the hair is pretty crazy, we would not want them to fling about when the character is being animated (please take note that, I did not create this in scale, also I do not think that correct scale is required).

I will be talking about the hairSystem settings and attributes (the ones which are of more importance).

Dynamics tab in the hairSystem
(I will not talk about the clump and hair shape tab)

#1 Iterations
Iterations controls the repetitions per time step of the hair solver, the higher the value, the more the hairSystem will calculate on the stiffness and the length flex, increasing accuracy and the cost of the simulation.

#2 Length Flex
Basically how much the hair curve can stretch along its length.

#3 Stiffness
Well, as the name suggests, it controls whether the hair curve is flexible or not.

#3.5 Stiffness Scale
Left to right: root of hair to tip of hair (start of hair curve to end of hair curve)
Down to up: not stiff to stiff

#4 Forces tab


I will not elaborate a lot here, since the most important one that I feel is the mass. The other settings, you can go to the help section of Maya itself and search "hairSystemShape" without the open inverted commas.

#4.5 Mass
Mass defines the mass (amount of matter in the hair), or if you want (although not scientifically equal), the weight of the hair.

That kind of sums up what I use overall. There are some attributes that you want to explore, those are fine even if it is in its default values.

Collisions and Turbulence is worth checking out.
After changing the settings on both the hairSystem, this is the final result that I have got:


I might be doing an extra tutorial continuing this one (like an extra part) talking about FK-ing this hair after being simulated to allow more control over the hair for animators.

You can get my working file here:

https://www.dropbox.com/s/2fph496gk6r1tqz/dynHairTut.ma

Please be reminded that this file is for learning purposes and is not to be abused in any matter, if you want to share or improve on it, just a credit will do, thanks.

If you have any questions, you can leave a comment or you can send an e-mail to me. Thank you for your audience.

Monday 2 December 2013

Dynamic Hair Tutorial Part 2 (Dynamic connections)

Welcome to the second part of the dynamic hair tutorial, by me, if you have not checked out part one of the tutorial, check it out here: PART 1

In part 1, we have gone through setting up the mesh needed (skinned to joints) for a dynamic hair simulation, and also went through the setting up of curves for the dynamic hair system.

In this part 2, we are going to do some connections, connecting the curves and joints and the mesh all together step by step. From here onwards I will be addressing the curves you have created in the first tutorial as inputCurves.

To start off, load up your file (if you have closed it) and check that you have the following items from the previous tutorial:

Mesh (model/object)
Joint chain (skinned to mesh)
Hair follicles
inputCurves (child of their respective hair follicles)
Output hair curves (not the same as the original curves)
Hair systems

*hint* You can check the uploaded picture in the previous tutorial. *hint*

Next, isolate ([shift + I] or hide the rest [shift + H]) the joint chain and the output curves.

Isolation mode, the whole joint chain and all the output curves.
What you are getting ready to do is to IK spline the joints with the curves that are already made. Check the tools settings of the IK Spline tool located at:

Animation tab>Skeleton>IK Spline Handle Tool (option box)

Default settings.
Set it like so:
The settings needed.

We do not want the curves to be auto parented to the joints they are in because that might cause it to become missing in the rig, we want it outside anything; in its own group. We also want to check the "Auto create curve" OFF, because we want the joints to be driven by the dynamic output curves we created a while back.

Now you have your tool set up, time to IK Spline those joints.

Click on the first joint once the tool has been activated (you will see something like a cross hair)
Next, click on the curve that runs along that joint chain.
Lastly, click on the last joint of the same joint chain (must be at the place where the last curve point is).
Do this for the rest of the joint chains and you will get the following results, the brown lines are the IK Spline and the cross at the ends of each joint chain are its handles.

Do not worry about the blue and the red lines inside the joint chain here, those are merely the inputCurves and the output curves overlapping each other.
At this time, your hair is now able to move dynamically, however, if you try to do it, you might destroy your hair rig.

There are actually a few settings to set before you can have it flow with a master control. You can just press the "play" button but you will not see much happening. Truth be told you are just 70% done.

In case you do not know how it looks like, it is situated at the bottom right corner of the whole Maya interface by default.
Be mindful this is not Interactive Playback, so you cannot move anything while the time slider is playing.
First thing to set is the "point lock" attributes on all the follicles, either one by one in the attribute editor or do it like me, on the channel box on the right side.

"point lock" attribute is fourth (4th) from the top of the follicleShape.

Set it to base, by having done so, it means that the base (starting point of your inputCurve when you created it, which is also the start of your hair joint chain) is locked in place and will be acting like a pinned point while the rest of the points on the curve swing about freely.


Now if you zoom in close enough, you can see that the hair joints are already moving a little bit at the ends. In the next section I will be guiding you on how to integrate the hair system components (hairSystem, outputCurves, follicles and their inputCurves) into the master joint of the joint chain.

First thing you realise, when you want to move the master joint of the chain, this happens:

The individual hair joint chains do not move and you might destroy the rig if you do not place the joint you moved back.
Basically, you can never move the joints which are part of the IK Spline, because the whole chain is controlled by the IK Spline's curve, your inputCurve. Thus, you have to let the joint above the hair strands joint chains control the follicles with the inputCurves. Try it now and you should get a different and more favourable result.

Follicles under their direct parent joints.

Now it can be moved when the master joint is moved.
Now that the follicles are placed correctly, you can hide them along with the inputCurves.

Select the follicles and [shift + H] to hide the things you selected.
The hidden follicles will look like that in the Outliner when hidden.
You can delete the groups where the follicles originate from since they are empty, you may wish to group all the IK handles from the IK Splines, the hairSystem and the output curves into a group, just to keep the Outliner clean.

So your Outliner will not be cluttered with a lot of things.

YOU ARE DONE!!
(well not really)

Your result should look like the following when in Interactive Playback:


However, if you have noticed, the hair mesh is penetrating the "head", I will go through the collision methods to have the hair not penetrating the head and I will go through setting up the hairSystem node in the next part.

Click here for Part 3

If you have any questions, you can leave a comment or you can send an e-mail to me. Thank you for your audience.

Wednesday 27 November 2013

Dynamic Hair Tutorial Part 1 (Setting it up for dynamic connections)

Time for dynamic hair rigging using NURBS curves and dynamic properties for them.

Start off by having a mesh (this can be done before or after the dynamic curve is done, but you need the mesh to know where to place the joints).
Simple fringe and long and short side hair strands. (Poly hair)
Make sure the pieces are broken down to pieces that you want to move/not move. Clear history and freeze transform, part of keeping the channel box clear and your RAM empty. UV the mesh now or later, it does not really matter, since again, you can clean it before you skin the mesh to the joints.
Each hair strand is a different mesh/object
Place the joints, along the curvature of the hair mesh. Orient the joints, the default settings in Maya itself should do the trick.

X-ray joints, you can see I share the joints on the 2 front hair strands.
Time to do the curves, the tool I will be using is the EP Curve Tool not the CV Curve too. any settings would work, I prefer the Curve degree to be set to a "Linear" since it will create straight lines going from one joint to another.

Default settings
As I was saying, to have the curve go from one joint to another, you need to snap ("V" key) the control points to be on the joints.

Mesh with joints (left), joints with curve (middle), curves (right).
Make sure you have renamed your mesh, joints and curves for easy outliner reading and organisation before going to the next step.

Those with "_skinned" are joints to be skinned, mesh will have a "_GEO" string, groups will have a "_GRP" string.
Remember, NO history and transforms, delete history and freeze transforms before skinning. I chose to skin the "selected joints" to the selected mesh because if I set it to "joint hierarchy" the side joints of the strands of hair are going to be influencing the side hair strands, which we do not want.
Skinning method is set to "dual quaternion" because that skinning method ensures a better deformation in the mesh when the joints move. The rest of the settings I leave them intact.

Skin time.
Now, hide all the mesh and the joints, either isolating the selection or go on the viewport menu and view only the NURBS Curves. Select all the curves and go to the "Dynamics" tab, click on "Hair" and go down the menu to click on "Make Curves Dynamic". You can assign a new hair system to another clump of hair if you want, but I put the fringe under 1 hairSystem and the side hair strands as another.

Go to the settings of the tool.
Set the "Attach curves to selected surfaces" to OFF because there is no surfaces for you to attach the curves to.
Just to check, your Outliner should look like this before you go any further:


This concludes the first part of the tutorial: set up for the dynamic curves driving the mesh  (no connections yet)

Click here for Part 2

If you have any questions, you can leave a comment or you can send an e-mail to me. Thank you for your audience.

Sunday 17 November 2013

Siggraph week.

SIGGRAPH Asia 2013 is here, technically not here, it is in Hong Kong.

Hope you are not put down by the first sentence, SIGGRAPH Asia rotates its location ever year, on year 2011 it was in Hong Kong, 2012 it came here to Singapore, now it is back in Honk Kong. I also heard that the next Siggraph is going to be in another part of China (don't take my word for it, I don't choose the place they want to hold the events). 

I went to the 2011 SIGGRAPH Asia in the form of a study trip with my schoolmates. The trip was organised by the Polytechnic and we did get subsidies, although the price were still a little steep (no I won't talk about the price). It was pretty interesting, however we only get to go to the conference for 2 days out of the 5 days. Our pass is also a basic conference pass, so we could not really go any special areas, basically the electronic theater and the art gallery and some talks were open to us.

Other days were spent as tourist going around the city area and the malls and night markets. I totally forgotten about the names of the places that we went to, I am seriously bad at names. Tourist aside, we did visit the company of FATFace Productions (http://www.fatface.hk/). From my knowledge, they specialise in special effects, basically the green screen stuff, they do a lot of compositing and deal with a lot of layers in the compositing software. The layers range from matte painting in the back ground to painting set extensions from live plates to live action takes taken with the green screen.

We got to "invade" their small meeting room as the Chief showed us their showreel, mainly focusing on the film 风云II (The Storm Warriors). The the film has a lot of visual effects as the characters possess many magical attacks as they attack their enemies and at one point attack each other (if my memory don't fail me). Majority of the film is done in a green screen studio and later composited into the final film. It is amazing what technology can do this days and that the right people that can turn multiple things into a fantastic final product like what FATFace Productions did.

That's about it on SIGGRAPH Asia 2011, now to 2012.

On SIGGRAPH Asia 2012, the conference was held in the Expo of Singapore, a few stops from my house, I signed up as a student volunteer (SV) to help out in the conference and meet other countries SVs to make connections. Our seniors were there and a few of them were Team Leaders. My team leader (the overall one) is Nicolas (find him here!), he showed us his final year project and it was very inspiring, the style was interesting and appealing, although the film was in French, I enjoyed the whole thing as it grabbed my attention.

SIGGRAPH Asia 2012 in Singapore Expo as an SV, sometimes it was a pleasant experience, sometimes it was just an OK experience. The good part about the whole SV program is that we get a full pass, and we can go wherever we like (common sense wise do not intrude other people's personal space and restricted areas). The bad part about it was that sometimes the shifts were very packed and we did not get the chance to go wherever we want, and yes, the shifts were generated by a computer.

I dint make a lot of friends since I was not very engaging and not very sociable, I consider myself a better listener. I try to be more outreaching nowadays, because in this industry, being alone is the worst thing ever. At the same time I did not have any name cards to trade, that will leave a puny impression of me since there is not one thing I can base my existence in.

Thus, this year 2013, SIGGRAPH Asia 2013 in Hong Kong, I did not plan to go for it and plan to go to the next SIGGRAPH. Firstly, I want to get all my work ready to show people, get my name card ready to trade and also brush up my social skills (seriously). 6 members out of 8 on the FYP (final year project) went for the conference, some as SVs and some on the study trip. 

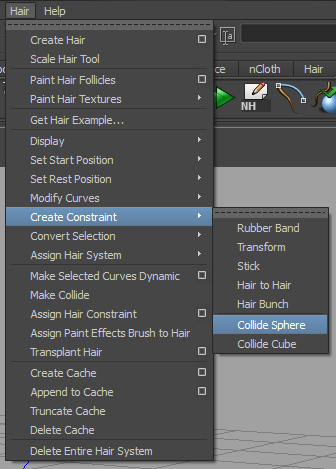
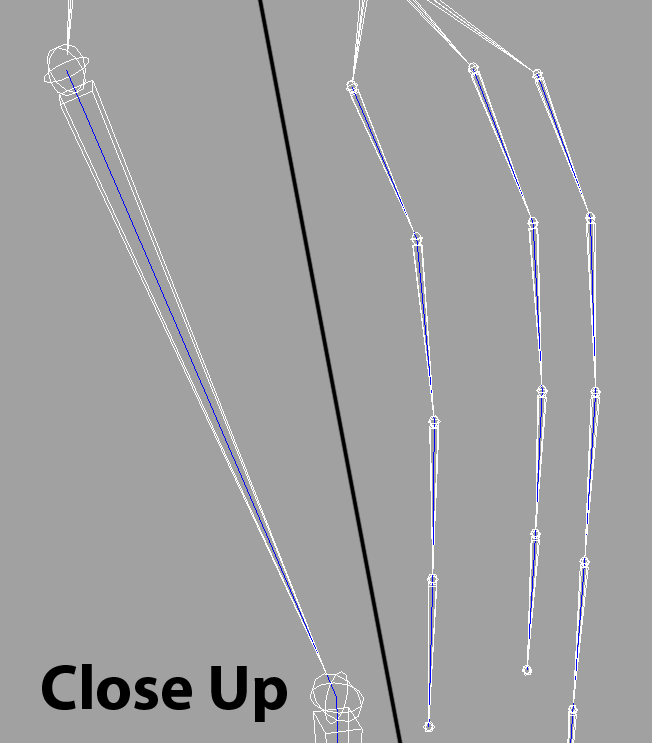
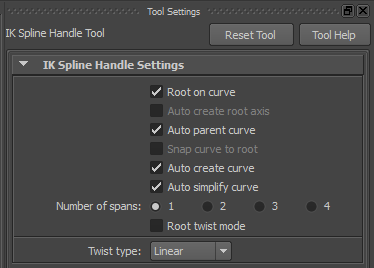
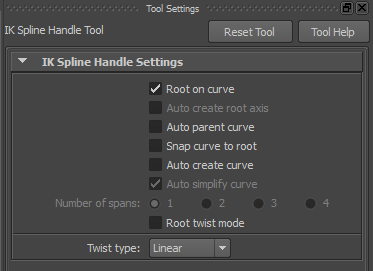
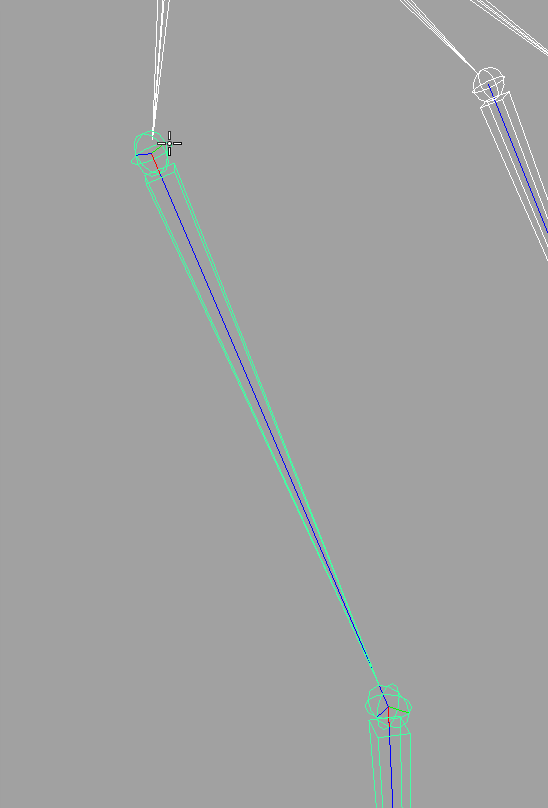
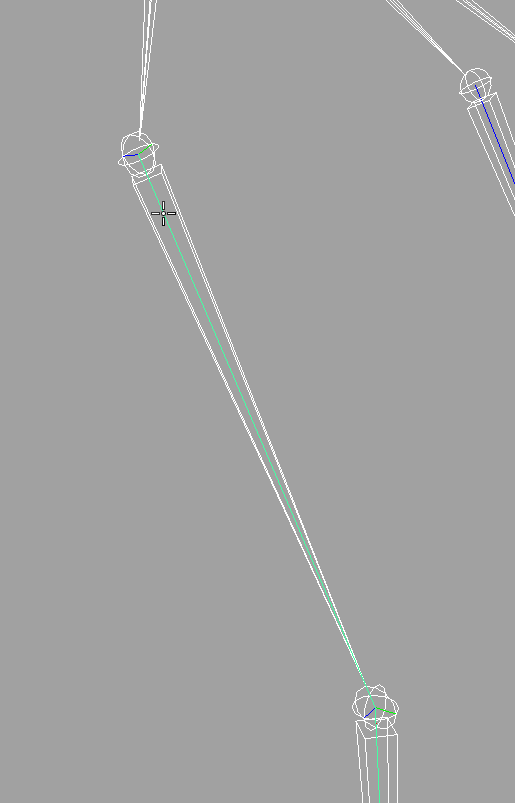
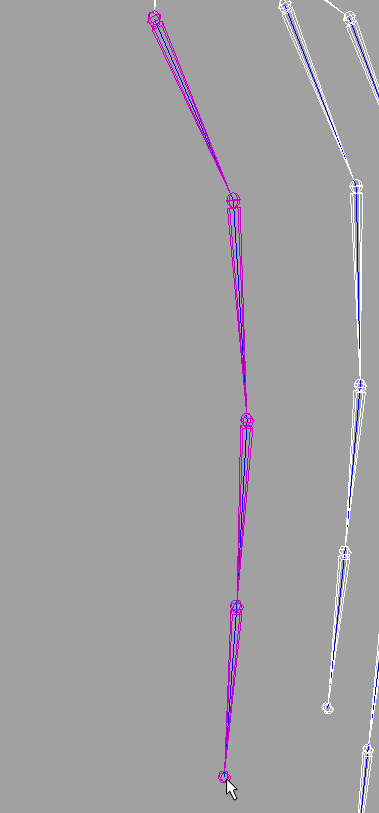
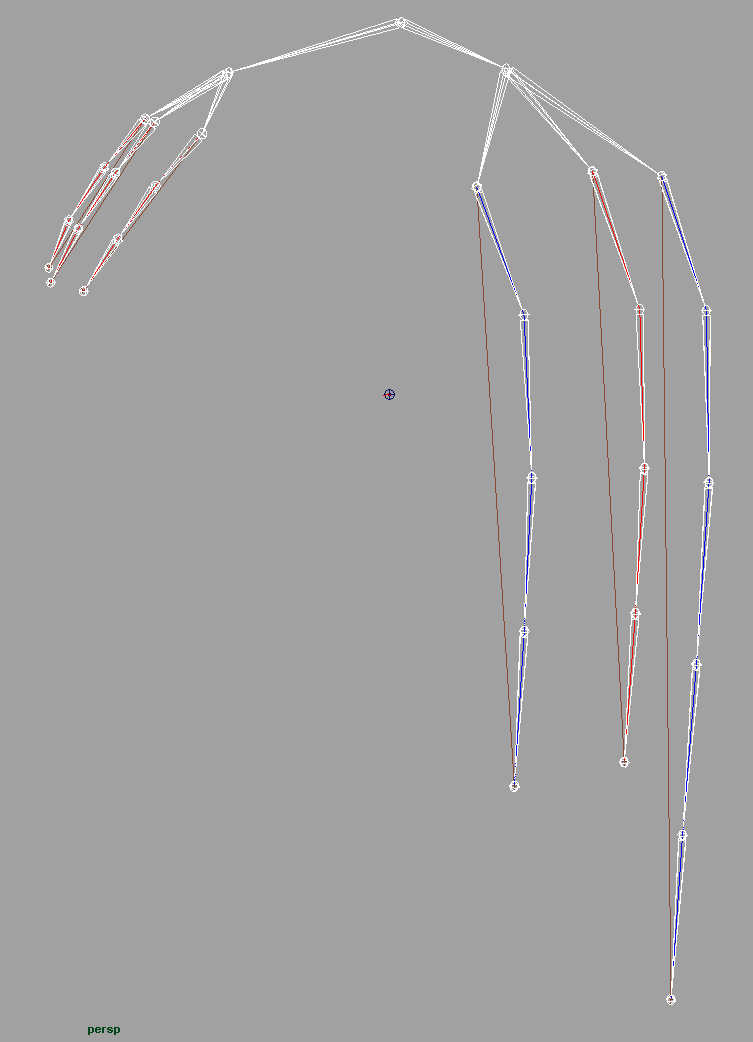
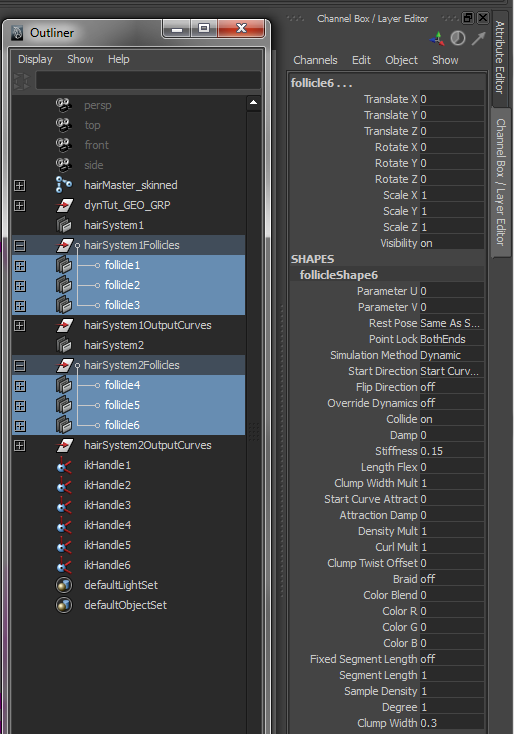
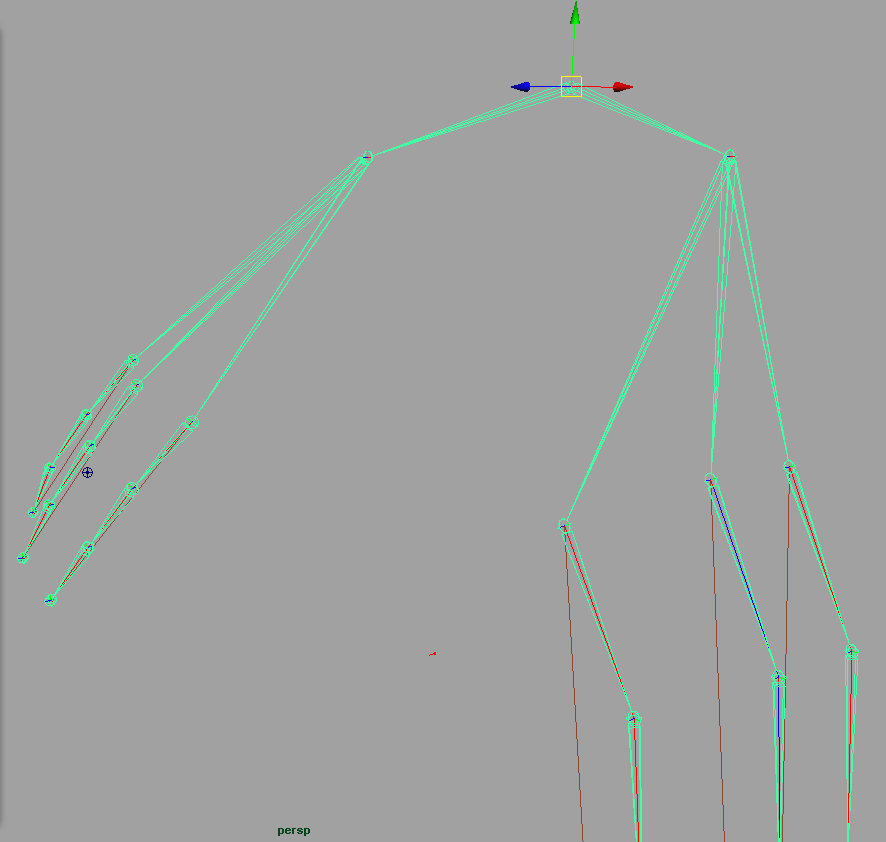
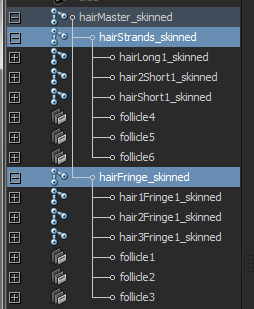
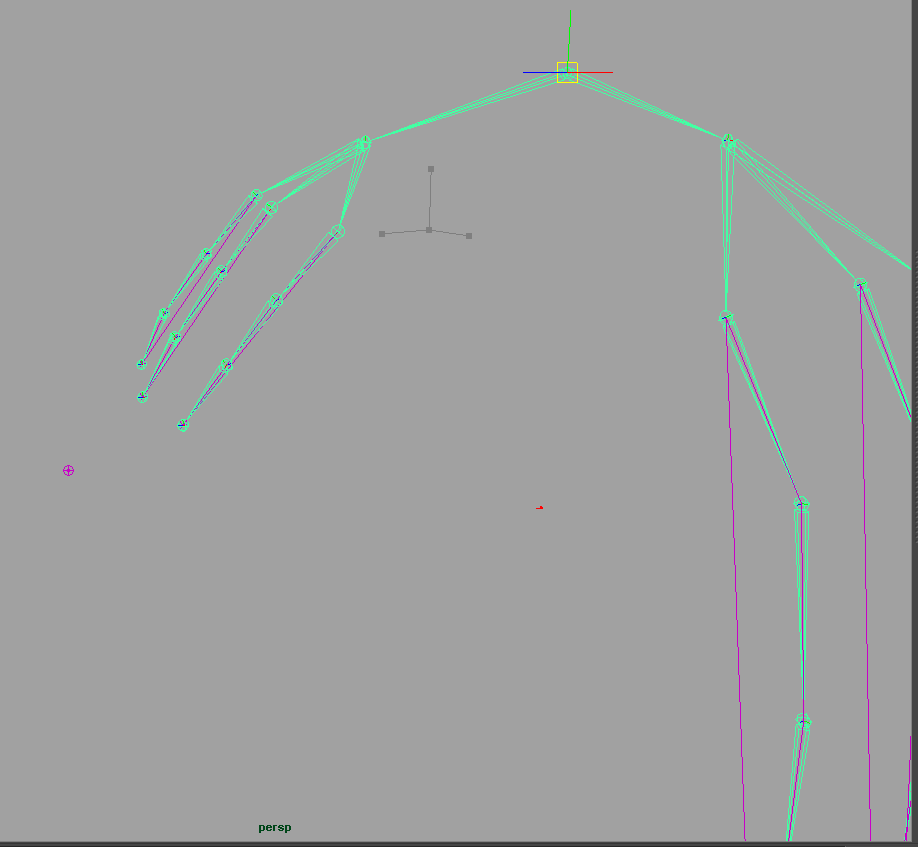
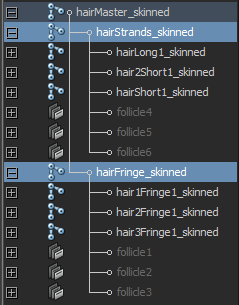
I will be staying back in school, running and creating hair for the characters. I created a connection system that allows the dynamic hair system to be controlled by a FK (forward kinematics) control chain. I first proposed this idea to a friend of mine, he was already doing the dynamic hair system and asked me if I could have any means to create a switch or an FK option. Thus, I proposed the system to him to make it more efficient. If I have the time and not mic shy I might even create a video tutorial for the rig. However, that might take a while, but I will post a picture tutorial at the end of the week if all goes well.

That is it for today, quite a long time to update though, at least I still kept the blog alive.

Monday 4 November 2013

Another month past and...

It has been a while (1 month) since I updated the blog, school had been real busy. Now I am serving my half a year (1 semester) of internship. Since I am involved in this 1 year final year project, I will be serving for the school.

Work wise, we are still behind time by around 2 weeks to 1 month. However, on the plus side, I'm churning out rigs faster than ever, and the animators can now start on the animation (actually they already started on the blocking sequence and finished the layout).

I encountered a problem with one of the working files, it usually happened when a non-referenced node is parented underneath a referenced node. This fosterParent node cannot be deleted no matter what, and Google did not really help a lot in removing the thing. The thing was created during one of the modelling stages, I did not check since another person was under that section and I was busy with rigging the main character.

fosterParent nodes
I found no method of safely removing all the assets from the file, I tried exporting all the selected objects. That merely caused the blend shapes and textures to screw up, basically all connections were on fire. However, I found out that instead of exporting, I could do the opposite, import the whole file (it was worth a try since I got this far).

I imported the file into another empty file (Maya's import system still have not worked for the placing of a string for clashing nodes, apparrently it keeps going back to prefixing all nodes.) Once the file has been imported, I can just delete the fosterParent nodes from the outliner with no other problems arising (none that have bothered me anyway in the future).

The problem about these fosterParent nodes is that they mess up the shots files and once the file is referenced in, it cannot be unloaded since it seems to get information from the already existing fosterParent nodes that something is being parented to the referenced in objects. Thus, it created a massive problem while doing the shots, and I had to take control of the situation and solved the problem.

There was also a large number of duplicated orthographic cameras created by some unknown methods. That was the first thing that shocked me when I opened the file, because the outliner was clogged up with that. Second thing is that they are not deletable.

Multiple duplicates of cameras.
For the cameras problem, it is very easy to solve as Google got me some useful sites explaining how to make them deletable through some simple script provided.

http://www.3dbuzz.com/forum/threads/171756-How-to-delete-a-camera?p=1412846#post1412846

schyzomaniac (kudos to him), a member of 3dbuzz forum provided a simple script to make the cameras deletable.

camera -e -startupCamera false persp1;

(name of camera to be deleted to be place at the "persp1" area)

 This script basically (from what I understand from reading it), makes Maya know that the camera is not a startup camera, and that it is not the default scene cameras (persp, top, side, front) and that it is just another normal camera. Thus in the end, one can just press the delete button to delete the extra cameras.

The other code which he provided was: 

lockNode -lock off persp1;

(name of camera to be deleted to be place at the "persp1" area)
 
From what I understand from the script is that this is to unlock the node and make it editable, basically if you want to delete it, one have to free it first

That is all for now, actually spent 2 days on this post,  hope I still have time to update this blog as the project goes on.

Friday 20 September 2013

Next rig and updates on the previous rig.

I was about to update a week earlier, but I can't turn back time, so I will just say what it was about. I have been doing corrections after corrections on the previous rig, and now i finally can move on to my next new rig, which is the mum of the first character.

To give an overview of the Mum character (sorry no pictures), she is of normal human proportions but it is her dressing method that needs some work. She is wearing a cardigan and a mid knee length skirt. the cardigan is a little bit loose and the skirt have to be simulated with nCloth. Both clothings will have to be sim-ed. I will be doing more research on that section and doing more improvements on the first rig since that is our most important character.

Our supervisor, have been going through the character designs, once there is a change, it goes down the whole pipeline. Design gets affected, model needs changes, rig have to be redone 50% (edits) and animation have to be put on hold (same for the rest of the pipeline).

Our layout artist, which is also our storyboard artist is having a very hard time since our supervisor keeps making changes to the storyboard/2D/3D layout, thus, she has to keep on making the changes and that slowed down production time a lot.

I hope I still have time to update on this blog on our progress and my progress, still, no promises.

Tuesday 10 September 2013

2 months forwards, and 2 months behind

It has been 2 months since I have updated, there is not much to say actually. First, I will start off by saying that our production is 2 months behind (actually that is what I like to think, but it is actually 2 weeks behind). There is a lot of design changes in the characters and this caused changes in the models, without the models I could not rig anything and the animators are stuck with nothing to do.

The design of the characters came out late, and coupled with my rusty rigging skills from not doing any rigs for around half a year, I took around 2-3 weeks, with adjustments and test rigs adding up to 3-4 weeks total for the main character (I am still tweaking for . However, that is not only what I did for that whole time period, I did the rig for 2 more characters, still primary characters, one in T-pose one in A-pose.

I don't think I can post any of the production stuff here since it is meant to be private and confidential and it is part of production secrecy. However, I think our director is setting up a websiite for our WIPs and I will update as soon as that kicks in. Until then, I think I can just post the controls I did for the main character.

Whole control setup, althou not finished yet.

The unfinished part is the lower lips part, figured it was more logical to have upper and lower lips control.
P.S. Our main character's name is called Mei Ling.

Eye aim controls, the slider controls pupil size.


FK setup, can switch with the "EX" control in the background.

IK setup, "EX" control highlighted.

Well, I try my best to provide a comprehensive control system for the animators, if they want anything, they will tell me and I will implement it. Other than that most of the rigs all use these types of control setup and I pretty much consider this my "default" setup way to go. I will reveal my joints placement when we start the website, till then that is all I can show.

Thursday 25 July 2013

Update frequency DISRUPTED.

I know I have been late on updates, it has been really busy, and I am going off dynamics for a while and going to rigging for the character I am doing. Sorry, but no sneak peaks so i am just going to leave it as that. Hope I have time to update the next time. 

I have also been really sleepy these days, happened to all my classmates as well. I would consider this a class-wide phenomenon.

Sunday 7 July 2013

nCloth Simulation

I started to learn nCloth to apply for a one year final-year-project in my school. Great tutorials from digitaltutors.com, helped me out a lot in tweaking the cloth and settings. 
Here is a demo of what I have made up:


It has been a while since I have updated the blog, I hope I have the time to update this every fortnight if possible.

Wednesday 27 March 2013

Blocks renders

The name can be quite misleading, a little bit because they do not really look like blocks and secondly it might sound quite boring.

To summarise, this is actually a lighting and rendering "just for fun" thing.
Programs used: Maya and Photoshop (still renders).

Starting out, I made a big ass mesh, comprizing of cuboids.

Admit it, everyone has a time in their life going all crazy.
Check out the number of faces by the way.

Then created a big ass sphere to contain the mesh and light it internally.

"Welcome, to the DOME"

After that... Render away.

This is a pretty old render, I think I lost the file, luckily I had it dug up from my archives.

As I said on the last photo caption, this thing started a while back. I have just picked it up from where I left off recently. The next few renders will be the recent renders.

I changed the material from lambert to blinn, making the thing more reflective and shiny(higher specular)
Now I have it shiny, I decided that it would make a pretty good desktop wallpaper, thus I bump up the samples to 4 and bump up the resolution to 1080p.

Furthermore, I made it golden.

Just changed light colour, not material colour.
Then the occlusion layer.

Occlusion layer.
The section with maya is over!
Now we move on to Photoshop.

Unfortunately, there is only 1 picture for this section because there is not much to show.

Just playing with different blending modes.
So yeah, one can achieve a lot of different results by just playing with the blending options.

Well that is the end of this post, try to explore a bit more and do not be afraid of trying new things out.

Tuesday 26 March 2013

Self Digital Painting

Wow, it has been a long time since I updated my blog (more than a month, going to 2 months).
The title is pretty self explainatory, and yes, I painted myself. 

First, I took a picture... well not me actually, I had one of my friends to take it for me.

Yes, it is in the school compound and that is the school's shirt.

Then I continues to block out the colours in multiple layers.

Blocking using ridiculous colours, yes!

Then started to move on to painting the greyscale of the body.
The shoes are a little sketchy.

Now some make-up.

Yeah, the hair...

Yes, now the hair. I had to experiment a few ways to get it done, but got it done-ish anyways. Just used a grass brush to paint it in different angles and then blurred the layer.

Almost done...

Final touches, add in colour layers and play with the blend modes.

Result:

Added background and shadow.
Well, that's about it for this post. I will post a personal project in another post. Its a 3D project comprising of automotive stuff.