Thursday 26 December 2013

Merry Christmas!!

Actually I do not celebrate Christmas, however I do celebrate the holiday.

This is a holiday post, I will tell you what I have been working on lately but no pictures, so sorry.

First up, I have been working on the Part 4 of the Dynamic Hair tutorial, going to be about the FK system on the system.

Secondly, I have been doing a lot of nCloth for my FYP (final year project), making skirts, sleeves and blankets.

Thirdly, I have been watching Breaking Bad, pretty cool show with chemistry involved, I studied chemistry in my Secondary school. I finished season 1 only though, will be watching more as the days come.

Fourth, and I think this will be the last, I've been Warframe-ing with my school pal, through the night. Great bonding session I'd consider it.

Well. that's about it, hope you had enjoyed your holidays!!

Monday 16 December 2013

Dynamic Hair Tutorial Part 3 (Collisions and hair settings)

Welcome to the third part of the dynamic hair tutorial, by me, if you have not checked out part one or two of the tutorial, check it out here: PART 1, PART 2.

In part 1, we have gone through setting up the mesh needed (skinned to joints) for a dynamic hair simulation, and also went through the setting up of curves for the dynamic hair system.

In part 2, we have gone through the connections, connecting the curves and joints and the mesh.

In this part 3, we will be going through setting up the collisions of the hair curves and some of the more important settings (that I felt was) of the hair system.

Please make sure you have your part done file that you used for the previous tutorial.

To start off, load up your file (if you have closed it) and check that you have the following items from the previous tutorial:

 In the GEO_GRP:
Mesh (model/object)

In the Rig_GRP:
Joint chain (skinned to mesh)
Hair follicles (in the master joint)

inputCurves (child of their respective hair follicles)

 In its own hairSystem_GRP:
Output hair curves (not the same as the original curves)
Hair systems


 For this lesson, all you need are the curves (either inputCurves or your outputCurves, pick one), and go to: Hair>Create Constraint>Collide Sphere

Do take note creating collide spheres/cubes (whichever suits your needs) you can only select a curve at a time and have a collide sphere/cube for a curve. However. you can have more than 1 constraint to a curve.


What it does is that it creates a sphere that collides with the hair NURBS Curve that was simulated. When created it will be at the center of the curve that you have selected on default. You can scale and reposition the collide sphere to anywhere you want the curve to collide into.

Rescaling of collide sphere.
A better perspective of the collide sphere following the curvature of the curve.
One useful way is to place it at the end (or if you want a very silky and flowy hair that bends a lot, you can have it go along the curvature of the curve) to prevent the hair from penetrating into the head.

So do all the collide spheres for all the curves and...

You should get something like this.
You can also create multiple collision spheres/cubes for one curve, like I did above.

Parent the constraints under the master joint (or any control in the rig that controls the master joint) because you want the collide spheres to move with the head and not stay there when the head moves.

I made a controller and a head joint (supposedly I followed how I would have rigged a full character [but then again the mesh is pass the origin on the negative side {for tutorial purposes only}]. I have provided a full expansion view of my outliner, just for you to check and if you have any questions, you may comment or send me a mail.


Your final result, without messing around with the hairSystem would be something like this:


As you can see, the hair is pretty crazy, we would not want them to fling about when the character is being animated (please take note that, I did not create this in scale, also I do not think that correct scale is required).

I will be talking about the hairSystem settings and attributes (the ones which are of more importance).

Dynamics tab in the hairSystem
(I will not talk about the clump and hair shape tab)

#1 Iterations
Iterations controls the repetitions per time step of the hair solver, the higher the value, the more the hairSystem will calculate on the stiffness and the length flex, increasing accuracy and the cost of the simulation.

#2 Length Flex
Basically how much the hair curve can stretch along its length.

#3 Stiffness
Well, as the name suggests, it controls whether the hair curve is flexible or not.

#3.5 Stiffness Scale
Left to right: root of hair to tip of hair (start of hair curve to end of hair curve)
Down to up: not stiff to stiff

#4 Forces tab


I will not elaborate a lot here, since the most important one that I feel is the mass. The other settings, you can go to the help section of Maya itself and search "hairSystemShape" without the open inverted commas.

#4.5 Mass
Mass defines the mass (amount of matter in the hair), or if you want (although not scientifically equal), the weight of the hair.

That kind of sums up what I use overall. There are some attributes that you want to explore, those are fine even if it is in its default values.

Collisions and Turbulence is worth checking out.
After changing the settings on both the hairSystem, this is the final result that I have got:


I might be doing an extra tutorial continuing this one (like an extra part) talking about FK-ing this hair after being simulated to allow more control over the hair for animators.

You can get my working file here:

https://www.dropbox.com/s/2fph496gk6r1tqz/dynHairTut.ma

Please be reminded that this file is for learning purposes and is not to be abused in any matter, if you want to share or improve on it, just a credit will do, thanks.

If you have any questions, you can leave a comment or you can send an e-mail to me. Thank you for your audience.

Monday 2 December 2013

Dynamic Hair Tutorial Part 2 (Dynamic connections)

Welcome to the second part of the dynamic hair tutorial, by me, if you have not checked out part one of the tutorial, check it out here: PART 1

In part 1, we have gone through setting up the mesh needed (skinned to joints) for a dynamic hair simulation, and also went through the setting up of curves for the dynamic hair system.

In this part 2, we are going to do some connections, connecting the curves and joints and the mesh all together step by step. From here onwards I will be addressing the curves you have created in the first tutorial as inputCurves.

To start off, load up your file (if you have closed it) and check that you have the following items from the previous tutorial:

Mesh (model/object)
Joint chain (skinned to mesh)
Hair follicles
inputCurves (child of their respective hair follicles)
Output hair curves (not the same as the original curves)
Hair systems

*hint* You can check the uploaded picture in the previous tutorial. *hint*

Next, isolate ([shift + I] or hide the rest [shift + H]) the joint chain and the output curves.

Isolation mode, the whole joint chain and all the output curves.
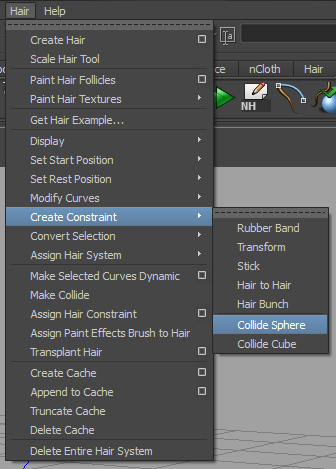
What you are getting ready to do is to IK spline the joints with the curves that are already made. Check the tools settings of the IK Spline tool located at:

Animation tab>Skeleton>IK Spline Handle Tool (option box)
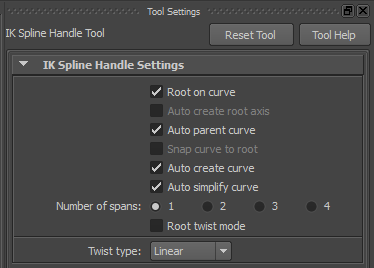
Default settings.
Set it like so:
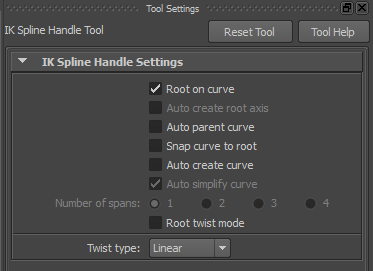
The settings needed.

We do not want the curves to be auto parented to the joints they are in because that might cause it to become missing in the rig, we want it outside anything; in its own group. We also want to check the "Auto create curve" OFF, because we want the joints to be driven by the dynamic output curves we created a while back.

Now you have your tool set up, time to IK Spline those joints.

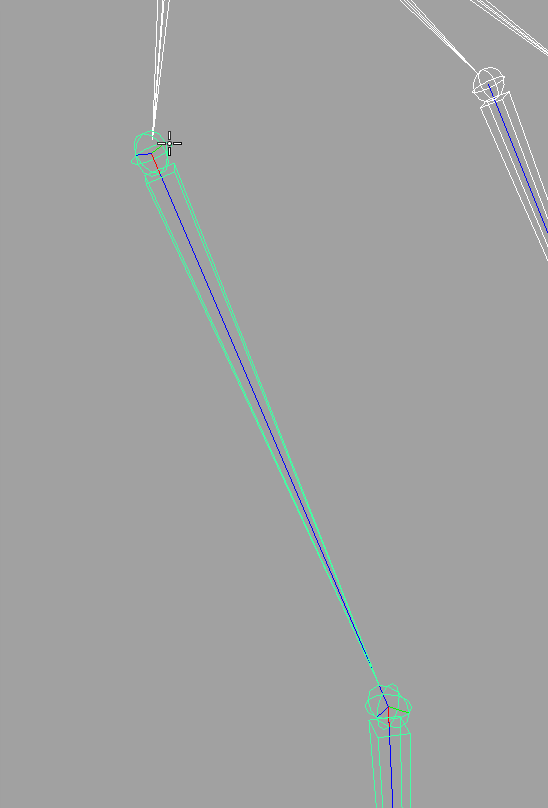
Click on the first joint once the tool has been activated (you will see something like a cross hair)
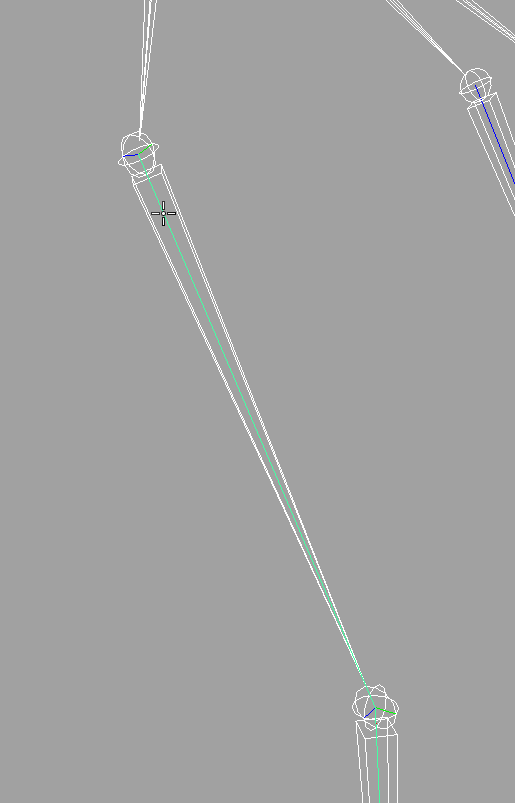
Next, click on the curve that runs along that joint chain.
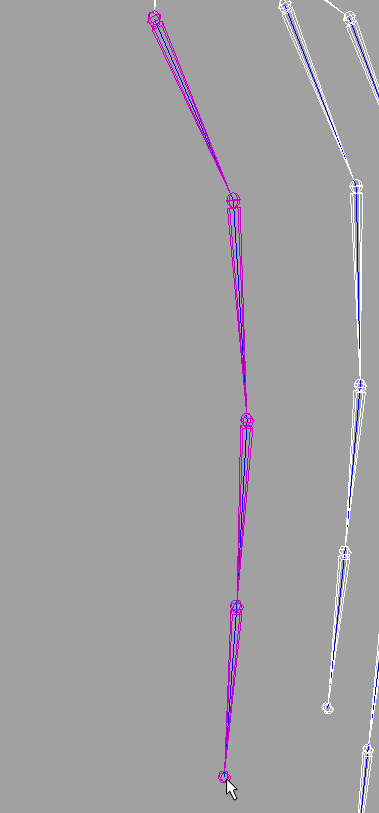
Lastly, click on the last joint of the same joint chain (must be at the place where the last curve point is).
Do this for the rest of the joint chains and you will get the following results, the brown lines are the IK Spline and the cross at the ends of each joint chain are its handles.

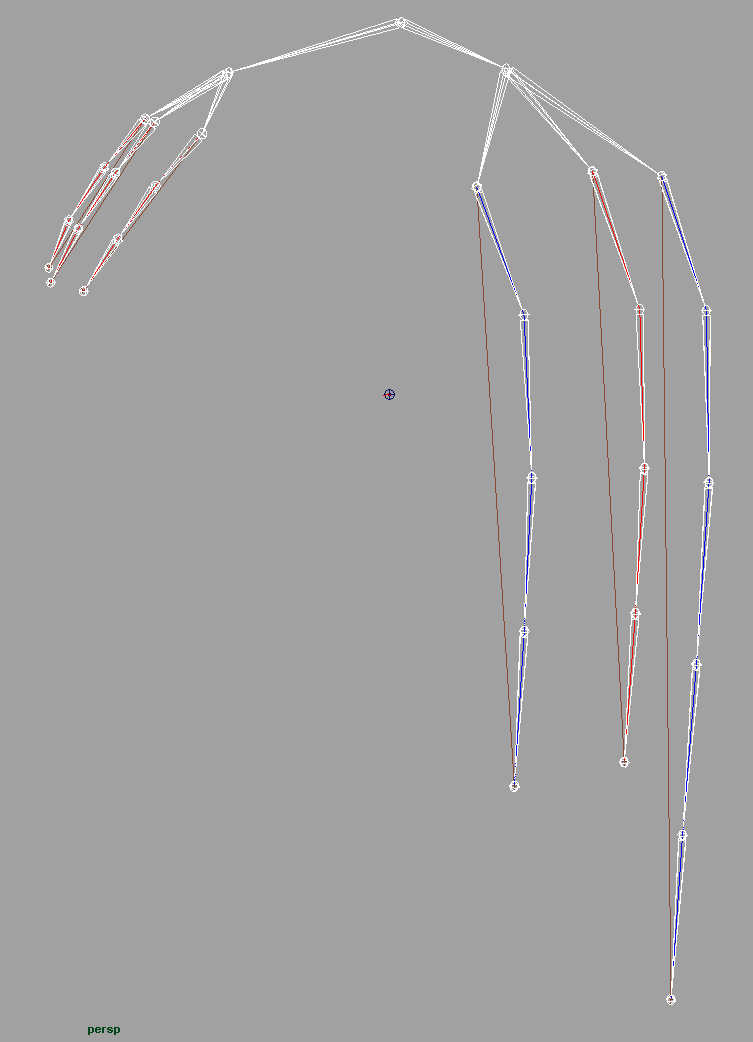
Do not worry about the blue and the red lines inside the joint chain here, those are merely the inputCurves and the output curves overlapping each other.
At this time, your hair is now able to move dynamically, however, if you try to do it, you might destroy your hair rig.

There are actually a few settings to set before you can have it flow with a master control. You can just press the "play" button but you will not see much happening. Truth be told you are just 70% done.

In case you do not know how it looks like, it is situated at the bottom right corner of the whole Maya interface by default.
Be mindful this is not Interactive Playback, so you cannot move anything while the time slider is playing.
First thing to set is the "point lock" attributes on all the follicles, either one by one in the attribute editor or do it like me, on the channel box on the right side.

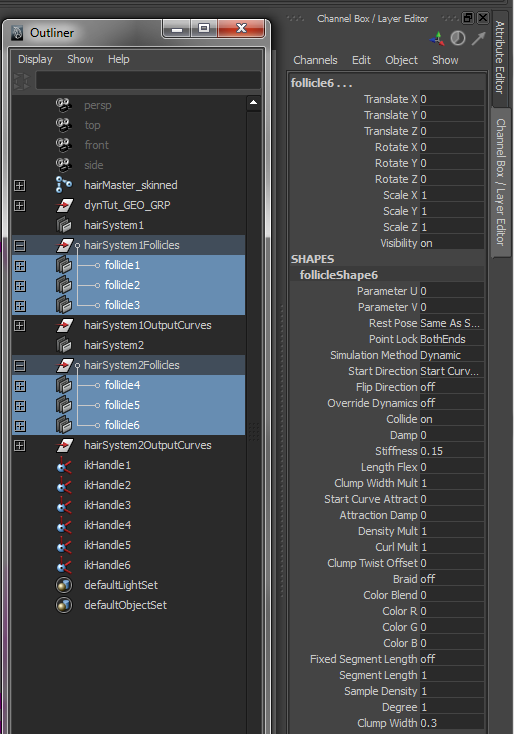
"point lock" attribute is fourth (4th) from the top of the follicleShape.

Set it to base, by having done so, it means that the base (starting point of your inputCurve when you created it, which is also the start of your hair joint chain) is locked in place and will be acting like a pinned point while the rest of the points on the curve swing about freely.


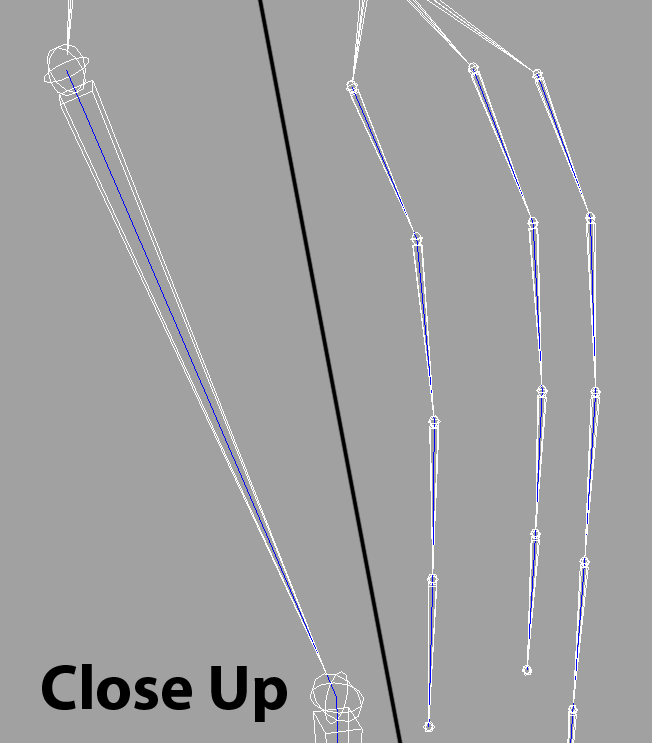
Now if you zoom in close enough, you can see that the hair joints are already moving a little bit at the ends. In the next section I will be guiding you on how to integrate the hair system components (hairSystem, outputCurves, follicles and their inputCurves) into the master joint of the joint chain.

First thing you realise, when you want to move the master joint of the chain, this happens:

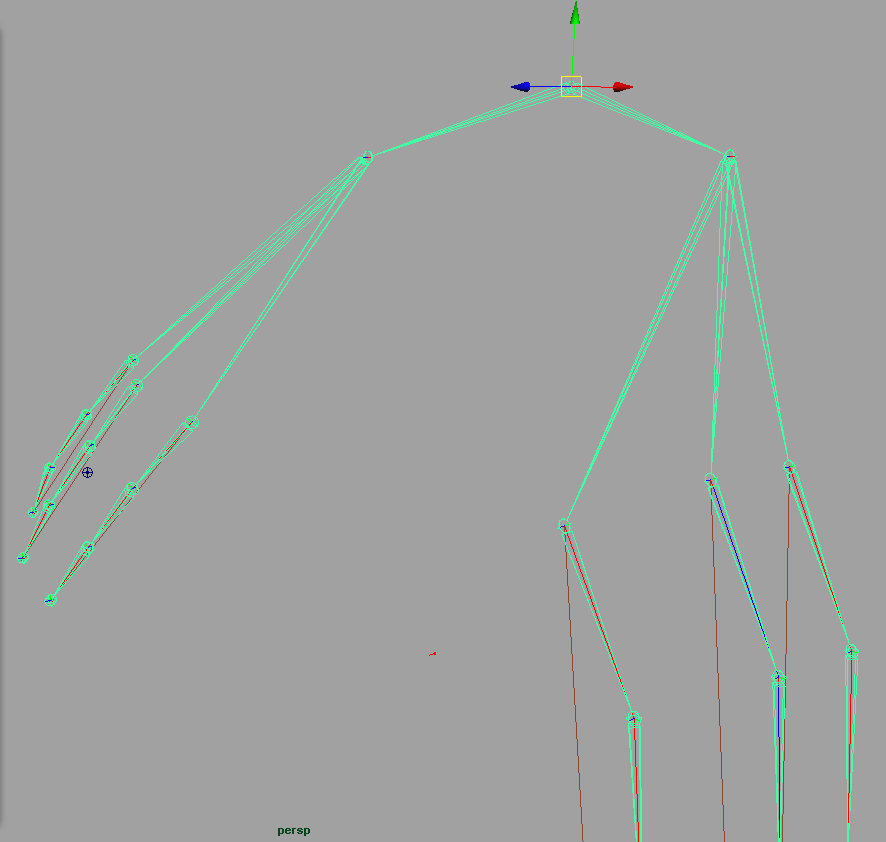
The individual hair joint chains do not move and you might destroy the rig if you do not place the joint you moved back.
Basically, you can never move the joints which are part of the IK Spline, because the whole chain is controlled by the IK Spline's curve, your inputCurve. Thus, you have to let the joint above the hair strands joint chains control the follicles with the inputCurves. Try it now and you should get a different and more favourable result.

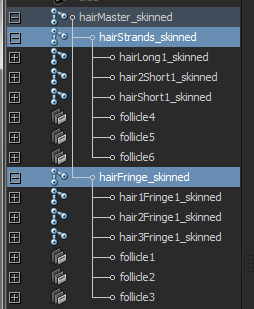
Follicles under their direct parent joints.

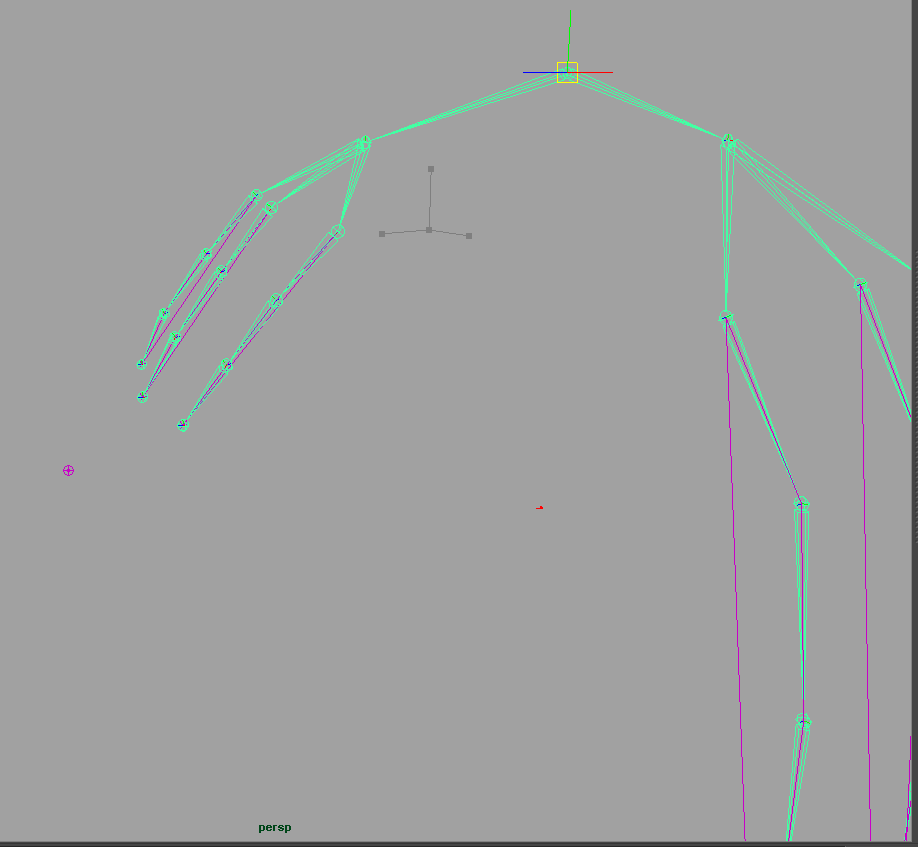
Now it can be moved when the master joint is moved.
Now that the follicles are placed correctly, you can hide them along with the inputCurves.

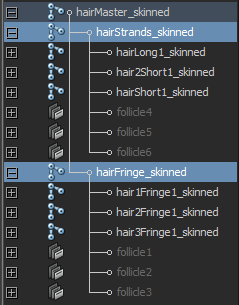
Select the follicles and [shift + H] to hide the things you selected.
The hidden follicles will look like that in the Outliner when hidden.
You can delete the groups where the follicles originate from since they are empty, you may wish to group all the IK handles from the IK Splines, the hairSystem and the output curves into a group, just to keep the Outliner clean.

So your Outliner will not be cluttered with a lot of things.

YOU ARE DONE!!
(well not really)

Your result should look like the following when in Interactive Playback:


However, if you have noticed, the hair mesh is penetrating the "head", I will go through the collision methods to have the hair not penetrating the head and I will go through setting up the hairSystem node in the next part.

Click here for Part 3

If you have any questions, you can leave a comment or you can send an e-mail to me. Thank you for your audience.