Sunday, 6 December 2015

Short film on CGBros

LONG TIME NO POST!!

Yes it has been a while, been out doing things and not getting things done in the end, learning C++ and not learning it at all at the same time, real frustrating stuff.

But hey! Remember I was talking about that final year movie I was part of a year back? No? In short, I was in my final year in Singapore Polytechnic and doing a final film for a year. I was in the technical department (I called it that), and ran the rigs and part of the simulations. It was fun working with  the others in their own specialised departments, but everyone will say their own work was the most fun. All in all, that film we made, was sent to multiple competitions. I will really have to dig them out since there are so many, nominated for some, won awards for some.

However, with all that said, it does not bring in much satisfaction, not until recently. Our Director (team leader), I did not know what he did or what he did not do, but he got our short film up on The CGBros youtube channel. What really moves me the most was that people connected with the film, and felt for the characters we created. There were so many encouraging comments and it was just... Truely amazing. I can say I am really proud of our work, how much hours we pooled into the film and made it such a moving and successful one.

Ok, that is enough words for the day, let our work speak for itself and...

Let it roll:


I just want to thank all those who left their comments in the comments section, those who really enjoyed the show as much as I like working on it. I seriously hope I can be part of a production in the future, whenever it may be.

Wednesday, 14 May 2014

Tips & Tricks related to Facial Modeling for Animated Productions by Sergi Caballer Garcia

It has been a long while since I have last posted, rest assured for those who are following me, I always keep my blogger page in one of my tabs. The blog will never die, unless I close it or declare it. At the same time, I will be serving the Singapore army soon, so that might or might not be 2 years worth of inactivity. Check back to see any surprises!

Now, I come to you today to offer you some great demo and teachings from Sergi Caballer Garcia. The article was posted on CGMeetup, here, I merely picked it up on my Facebook feed and thought it was great information to share with the good people here.

Picture taken from CGMeetup.com
All of this tips and tricks can be used on any 3D modelling software, as Sergi said, and I quote, "all of the steps and methods showed on these timelapses are the same ones you’ll find in other packages, such as split, insertEdgeLoop, extrude, merge, sculpt, etc.". 

The whole article will touch on topics like workflow, topology, deformations, appeal, hair modeling and all the little tricks you can pick up to improve on any models. Sergi also touches on the Sculpt Geometry tool, not a lot of modellers that graduated from my school that I know uses this tool for creating organic models. I tried it once on an inorganic blanket model (using a mouse), well, I guess I like the control the mouse gives as compared to the pressure that varies on the tablet.

Well, for the rest, the article is pretty self explanatory.

You can check out Sergi Caballer Garcia's website here, it includes a lot of works he had done before, deeply inspiring and impressive too.
http://www.sergicaballer.com/home/
Picture taken from Sergicaballer.com
Well that is it for today then, what a long time for an update.

Friday, 25 April 2014

Dynamic Hair Tutorial Part 4 (Extra, controlling the hair with FK joints)

Welcome to the third part of the dynamic hair tutorial, by me, if you have not checked out part one, two or three of the tutorial, check it out here: PART 1, PART 2, PART 3.

Quick overview of parts 1 thru 3:
made mesh for rig
made joint system to control mesh
made dynamic curves to control the joints
made hairSystem drive the dynamic curves
made collision spheres for the hair curves
create a simple control (NURBS curve) system to control the head and collision spheres

As I said in Part 3, I am going to dedicate this post to the creation of the FK control for the dynamic hair (at least I will show you how I did it).

This can get kind of confusing and technical, if I left it there for a week or two I might get rusty with the details, thus breaking the rig. So I am doing this for whoever wants to learn from me and for me to remember and also to get critics on how can I improve this (or another way to get this done).

Exposition:
It started out as a theory as I followed the control hierarchy (who controls who) when a friend of mine asked for some help with dynamic hair. What started off on the whiteboard became a reality in Maya itself, and I wanted to share this knowledge with those who wanted to learn. Now that the exposition is done, we shall continue.

Next, a few things to take note about my naming conventions because there seem to be a lot of confusion in explaining things with the names (it even confuses me too).

hairSystem = hairSystem

input of dynamic nurbsCurve = inputCurves

 output dynamic nurbsCurve (the ones that move) = outputCurves

dynamically driven joints = dynHairJ_01 (numbers vary)

groups = denoted with a _GRP

groups to be constrained = PARENT_GRP or ZERO_GRP
(ran out of vocabulary, difference will be explained later)

controls = denoted with a _CTRL

skinned joints = denoted with a _skinned

Here is a picture that I made in Photoshop (should have done it in Illustrator) to cover the whole system, it might be useful to those who are more of a visual learner.


You might find something peculiar about my own setup as I continue the tutorial, like there is a missing group in this diagram. Yes, there is a group that is missing from this diagram, which is the CTRL_GRP, it is mainly a group tat I place above my controls (CTRL) to orientate the manipulator of the controls (CTRL) in the direction of itself.

Tutorial here

As explained, doing the group thing keeps values off active controller curves while keeping them in the correct orientation. I did not want to put them inside the flow chart because that will clog up the thing.

With the overall flow chart of the system done, I shall be talking about it in words.
(You can skip this section if you want)


1. You have your hair system here, the dynamic hair is already simulated.
2. The moving hair curve will be controlling the hair joints through the IK Spline.
3. The dynamic hair joints will be controlling the hair groups.
4. The hair groups contain another group which will be controlled by the upper control through a parent constraint.
5. The translations and rotation values will displace and turn the controller that will control the skinned joint that is the child of it.
6. The skinned joint is skinned to the hair mesh and cause the hair to move as well.


OK, now with the theory of it done, I shall proceed with the step by step tutorial of the setup.

First (you would have noticed I do not continue with second or third), get your file ready, either your own file or the file I provided on here:

https://www.dropbox.com/s/yymdtuutf22w2od/Tut0102.ma
I edited the file a little to match the names of the dynamic joints.
Now that you have your file open, create an overlaying/overlapping joint chain of the dynamic chain that you have.


Then next would be the controls, you might want to go through the tutorial about the orienting of the controls.


This part you can go either way, either re-skin the mesh to the overlapping joints and the start of the branch to the dynamic joints or re-skin later after the connections are done, where you have to skin selected joints.

I personally prefer the second way since I like to get my rigs fail proof before skinning anything. I am going to show the skin first and the skin last parts as their respective sections.
(special sections will "*")

1. Detach skin from the mesh.


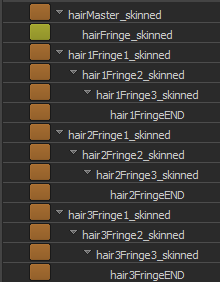
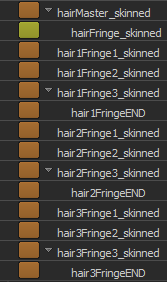
*1.5. (If you want to skin first) Skin the needed joints.*

 This shows all the joints that I binded.

2. Unparent the joints of the overlapping joint chain (the one in blue)


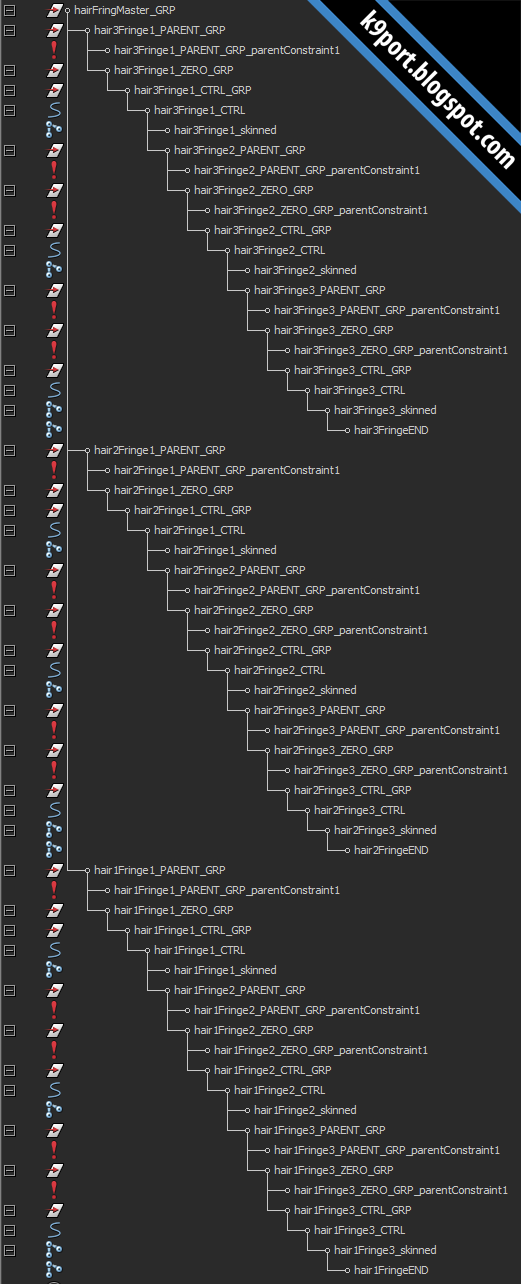
3. Follow the flow chart and arrange the groups that controls the controllers as they are on the right side of the flow chart.


4. Constraint the the respective stuff according to the flow chart (right side of flow chart first)


5. Constraint the the respective stuff according to the flow chart (left side of flow chart now)

Yep, it is getting larger and larger.
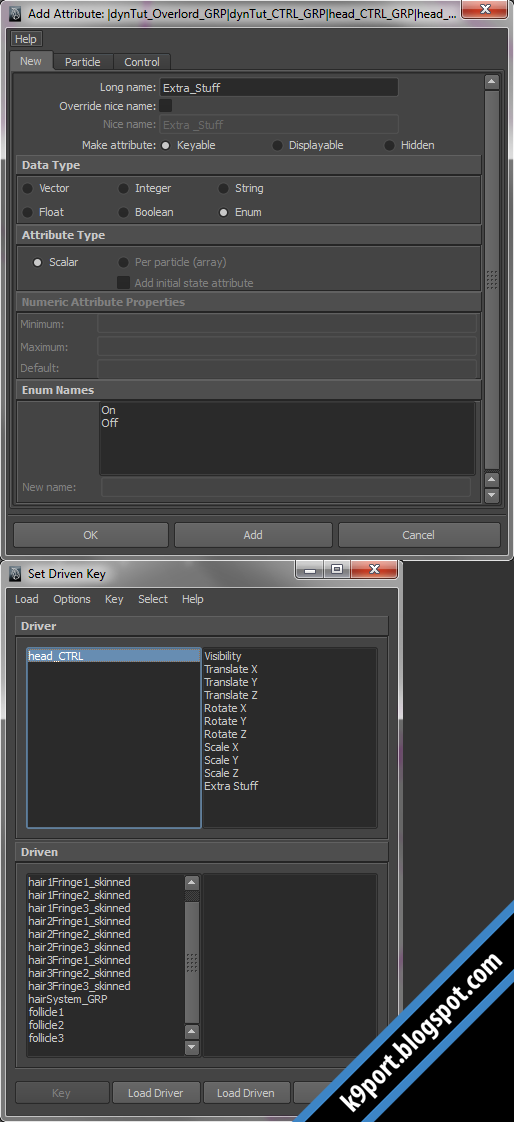
5 Optional Step. Create an attribute to hide all the unneeded stuff to be touched on.

Key the visibility of the items.

5.5. (If you chose to skin the mesh last), skin the mesh.

Though it may look like this, it is totally fine, unless you have other plans.

6. Enjoy your new dynamic hair with FK controls that can control the hair, after the simulation.


I actually had to enlarge (scale) the controllers because they were too small and hidden inside my hair mesh.

https://www.dropbox.com/s/kroicmkcc82wfd7/Tut0102Final.ma
Final file for your reference.
 Please be reminded that this file is for learning purposes and is not to be abused in any matter, if you want to share or improve on it, just a credit will do, thanks.

Hope you really enjoyed this ride with me through the tutorial, I hope that we all learn something from it. That is all for the Hair Dynamic tutorial folks!

Sunday, 9 March 2014

Demoreel~ (21st Feb 2014)

This is my demoreel, updated to 21st of February 2014.
Included are a character from my final year film and some shots from it too.

Vimeo:


Youtube:


QR codes:

Thursday, 27 February 2014

Back again, loads of useful info on some rigging stuff.

It has been like what? 1 month? Yeah, I have been very late with my updates, but not to fear, I come here with something to show. This whole month have been flooded with a lot of simulations and cloth and rendering. Our final film is nearing its submission date and we still have animation unapproved. The best we can do is to make do with what we had and render everything out. Most of the shots are completed but we still have a minority of those which are of substandard quality. 

Rendering was taking a toll since we had to run around opening files and rendering them in school (nope we do not have a render farm, yet[I hope]). Some shots we will split the layers to be rendered in different computers. By the way, the rendering was not headed by me, but the lighting, composting and rendering head, I do not know if I should put his name here, still, blog posts could be updated. It was hectic at first because of the sudden flood in the amount of shots we have to render, however we managed to keep our calm and manage everything, all in a notebook. In the end, bulk shots were rendered overnight and renders are done the next morning (the day of submission).

Well, either way, hectic time is over and we get to polish the final film until the Graduation show, on 13-14 of March Singapore time. This will mean more resim for me and will probably take up a chunk of my time, although I can be more relaxed about the working hours in school.

UPDATE on Dynamic Hair Tutorial Part 4:
Nope, I have not gotten around to creating a video for it, yet, although the main bulk of the tutorial is done. Hope I still can finish it if time permits.

Other information:


The video touches on some key items like node based rigging, included in Autodesk Maya 2013 and onwards (presented in the video is Maya 2014). It also touches on using some of the provided nodes to rig for example the hips of the character to be always in the center of both feet, instead of using scripts to quicken the evaluations.

Maya Set Driven Key Tutorial by Daryl Obert


This video touches on SDK (set driven keys), its basics and its function and tweak-ability using the graph editor. Daryl Obert explained it pretty clear and demonstrated the use of SDKs very well.


 This video also by Daryl Obert, will talk about nParticles in Maya and the fields of nParticles. This video gives an insight to the power of nParticles simulation inside Maya itself. It is a great video if one is interested in effects inside of Maya itself.

Yeap, that is all for today then. I wanted to say that Autodesk really outdid themselves, although each version of Maya has its own bugs and glitches, the newer one is considerably better than its own predecessor. It is great that Autodesk started to build in the node based system interface in Maya 2013 and its future versions. That allows better organisation and quicker workflow, whether one is rigging or doing animations or even effects.

Wednesday, 29 January 2014

Been really busy lately~ V2.0

Been really busy lately V2.0

Yeap, that kind of explains everything, I have been trying to find time to make the video on the Part 4 of the dynamic hair tutorial. However, I have been assigned (pre assigned but now the animation is done, I have to do the effects), more work to do. That left me little time to rest and to do the video and even update the blog.

At the same time, I have to prepare the materials that are going to be used in the Singapore Polytechnic's Graduation showcase. I linked my bio on the website to this blog, and most probably going to link it on my name card too. I have to prepare my demoreel too, so watch out for that.

Well, I have to get back to work now, this post looks like a quickie post, but I cannot help it, it is the truth.

BACK TO WORK!!

Monday, 13 January 2014

Been really busy lately~

OK, first and foremost, I like to apologise for those of you who are awaiting on my 4th part of the dynamic hair tutorial (whoever is out there~), I have been really busy lately.

Busy with what you ask, well, I have been busy in updating the blog's pictures; mainly the pictures on the tutorials. Since I seem to be having a lot of images now, I thought of organising them in my storage device. It started out as a very messy process since all the images are everywhere. I had also renamed the pictures for a better tracking of them and organisation. I changed the tutorial files' names too and created an icon for the download.

Also, it seems as if i went crazy with my watermark, putting them in almost all the pictures in my recent tutorial. I thought it was a good idea to stamp it with my mark, like a signature. I took the blue from the blog itself and made the designs of the icons and signature myself.

Ah! At the same time, if you are a faithful follower of my blog (or if you are new), I would like to say that my blog is intended for desktop/laptop usage on the web browser and not intended to be used on phones. I did not setup the mobile version of the blog since the images are sometimes quite big and it is meant to be like that because sometimes the words are very small and there are a lot of them (example: outliner)

That is all for today, and yes, I am still working on the Part 4 of the tutorial, stay tuned if you are following me.

Tuesday, 7 January 2014

Oreintating Controls Using a Group

I talked about orientating controls in my Dynamic Hair Tutorial Part 4, I did not want to clog up the hair tutorial about other rigging things that I do. I figured I start another post talking about it, maybe I will be linking other tutorials here also.

In this tutorial (I would not really consider it a tutorial, more like a share session), I will be talking about how I orientate controllers (NURBS Curves) to joints/a joint chain; using groups above it and leaving the channels of the controllers empty.

First 3 things to understand, more like 3 situations to understand:


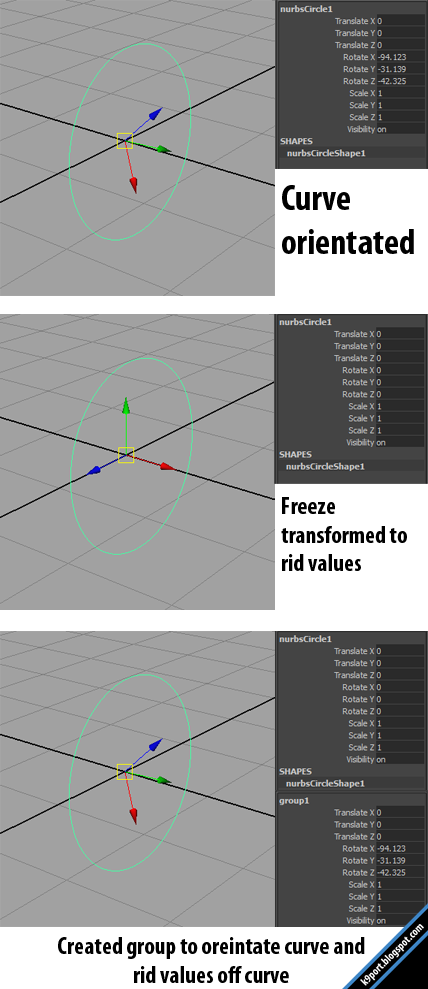
1st situation (top): Curve Oriented
Yay! You got it to point the correct way and the manipulator is pointing the correct way, however, there are values on the channels, which is not animator friendly when they want to animate. Animators would want all the channels to be clean and all to be zeroed out (except for scales).

2nd situation (middle): Freeze Transform
You try to salvage the situation by freeze transforming and killing the values in the channels. Although you killed the values, you have reset the manipulator to its parent (in this case it is the world)

3rd situation (bottom): Group It (new setup)
Since you made a group for the controller, meaning the group is the parent of the controller. At the same time, nothing is done to the rotation of the controller, meaning it will inherit the rotation (not values) from the parent group. In conclusion, you have got the controller to be pointing the correct way but at the same time you leave the channels values empty; best of both worlds.

Next section: I will be showing how I orientate the controllers to a simple rigged mesh and joint chain.

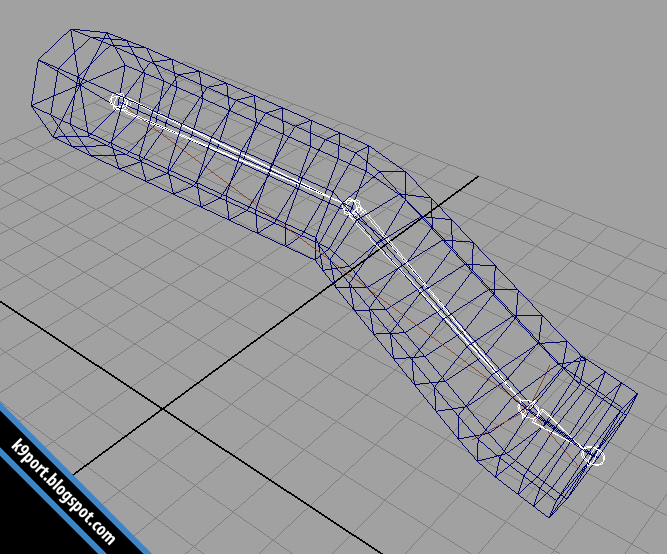
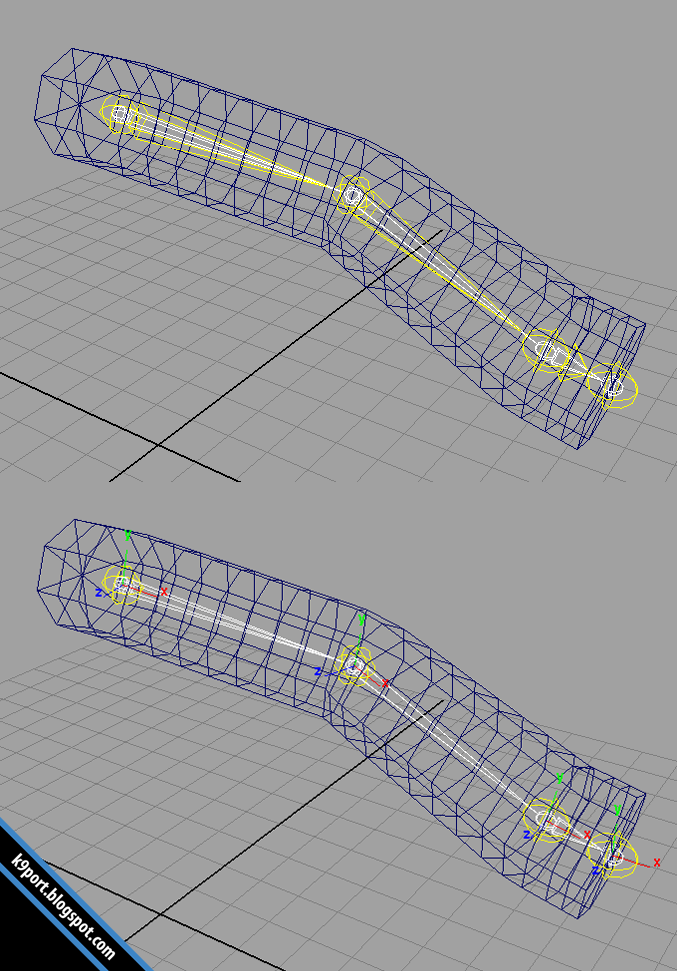
This is a simple FK arm I made up in a few minutes with the mesh following the chain.


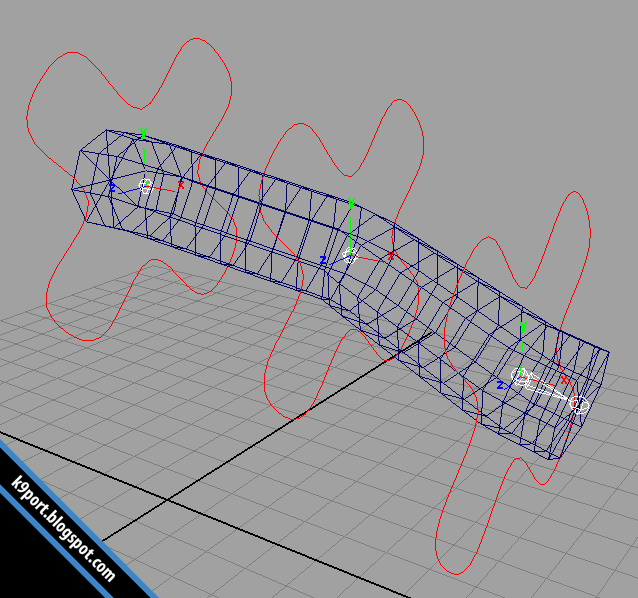
Step 1: Create controllers (NURBS Curves) and place them on the place you want the controls to rotate about. In this case, I would put the controls on the same location as the joints. 

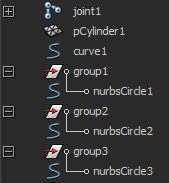
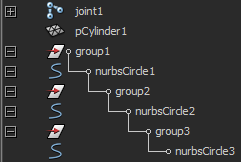
Step 2: Group each controller under a group and center pivot (or you can move the pivot of the group to set it the same as the controller).


I cannot show you that I have changed the pivot of the groups, but they are center pivoted.
(meaning same pivot as the controller that it holds.
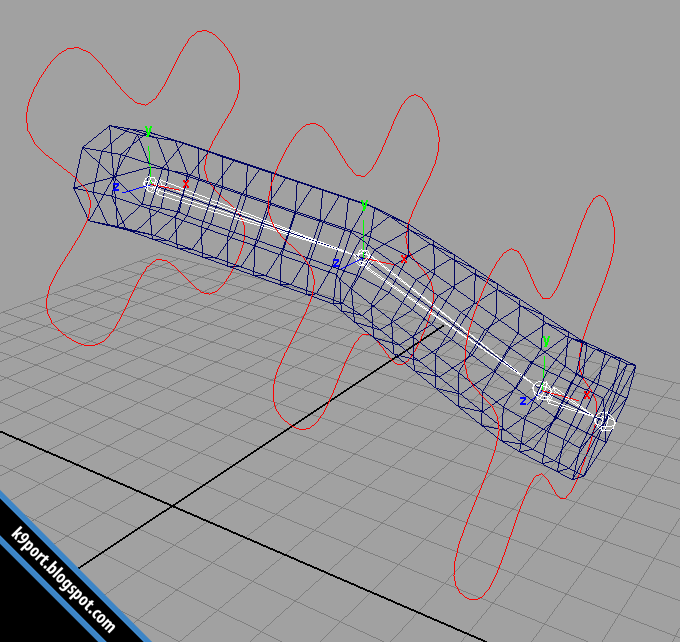
I turned on the visibility of the local axis of the controllers so you know where are they facing.
Step 3: Either A or B, step A will require building another joint chain above the existing one, for deconstruction (so that you do not mess with the original skinned joints) while step B requires unparenting of the joints.

 Step 3A: Make a joint chain above the original (same position of joints) and orient joints for that, they should be in the same orientation as the skinned joints.
 
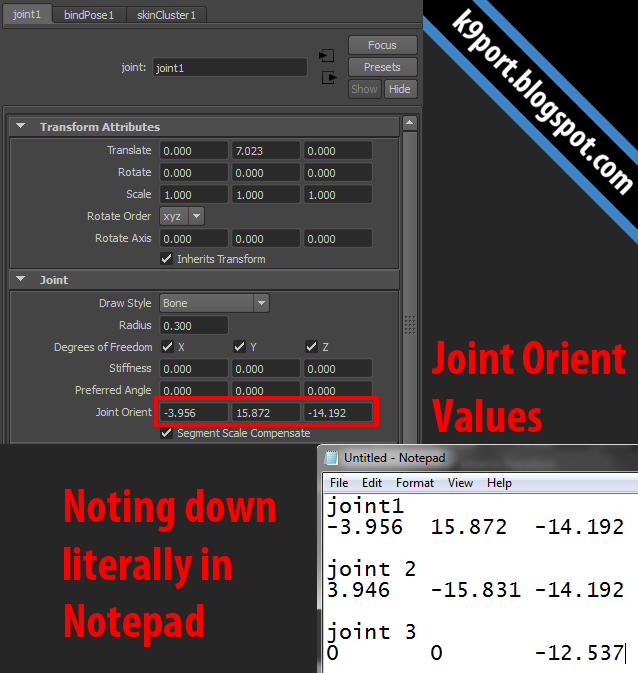
Step 3B: Unparent the joints from their parents as shown and note their rotational values in the attributes tab.


Step 4: Note down the joints orient (either the original skinned joint or the specially created duplicate).


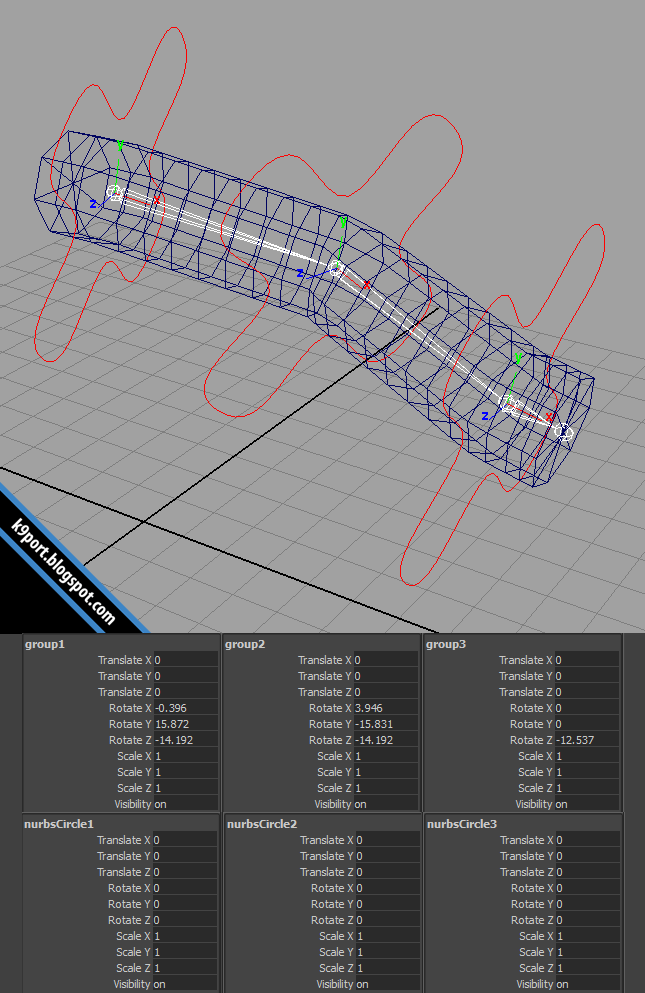
Step 5: Copy the values of the joint orients to the group channel.

Values in the groups and no values in the controllers.
 Step 6: Parent the groups to the controls, the controls control the groups which control the control.

I think it is better if there is an image here:


The rest is just orient constraining the controls to the joints and that is all.


In conclusion, your controls will be pointing in the same exact direction as the joints. This works well for FK since the controls will rotate in their local axis transferring the same values to the joints, meaning no mixed values from axis (eg. x and y axis of the controller affecting the x axis of the joint)

I provided a file here if you need it for reference:

https://www.dropbox.com/s/0b6ew7ngl9xipz0/Tut0201.ma

I find this method very useful to orientate controllers in a rig, I do encourage your thoughts and opinions and if you have any critics, I'd be open to it, thank you for your audience and have a nice day.

All materials used were with the intention of education, please credit if you linked it here.

Thursday, 26 December 2013

Merry Christmas!!

Actually I do not celebrate Christmas, however I do celebrate the holiday.

This is a holiday post, I will tell you what I have been working on lately but no pictures, so sorry.

First up, I have been working on the Part 4 of the Dynamic Hair tutorial, going to be about the FK system on the system.

Secondly, I have been doing a lot of nCloth for my FYP (final year project), making skirts, sleeves and blankets.

Thirdly, I have been watching Breaking Bad, pretty cool show with chemistry involved, I studied chemistry in my Secondary school. I finished season 1 only though, will be watching more as the days come.

Fourth, and I think this will be the last, I've been Warframe-ing with my school pal, through the night. Great bonding session I'd consider it.

Well. that's about it, hope you had enjoyed your holidays!!

Monday, 16 December 2013

Dynamic Hair Tutorial Part 3 (Collisions and hair settings)

Welcome to the third part of the dynamic hair tutorial, by me, if you have not checked out part one or two of the tutorial, check it out here: PART 1, PART 2.

In part 1, we have gone through setting up the mesh needed (skinned to joints) for a dynamic hair simulation, and also went through the setting up of curves for the dynamic hair system.

In part 2, we have gone through the connections, connecting the curves and joints and the mesh.

In this part 3, we will be going through setting up the collisions of the hair curves and some of the more important settings (that I felt was) of the hair system.

Please make sure you have your part done file that you used for the previous tutorial.

To start off, load up your file (if you have closed it) and check that you have the following items from the previous tutorial:

 In the GEO_GRP:
Mesh (model/object)

In the Rig_GRP:
Joint chain (skinned to mesh)
Hair follicles (in the master joint)

inputCurves (child of their respective hair follicles)

 In its own hairSystem_GRP:
Output hair curves (not the same as the original curves)
Hair systems


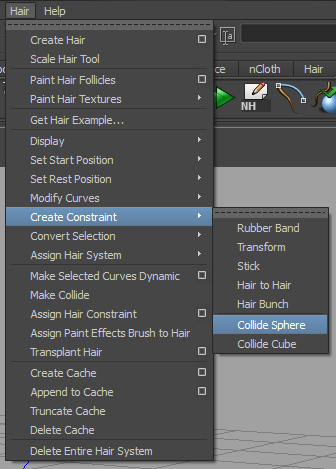
 For this lesson, all you need are the curves (either inputCurves or your outputCurves, pick one), and go to: Hair>Create Constraint>Collide Sphere

Do take note creating collide spheres/cubes (whichever suits your needs) you can only select a curve at a time and have a collide sphere/cube for a curve. However. you can have more than 1 constraint to a curve.


What it does is that it creates a sphere that collides with the hair NURBS Curve that was simulated. When created it will be at the center of the curve that you have selected on default. You can scale and reposition the collide sphere to anywhere you want the curve to collide into.

Rescaling of collide sphere.
A better perspective of the collide sphere following the curvature of the curve.
One useful way is to place it at the end (or if you want a very silky and flowy hair that bends a lot, you can have it go along the curvature of the curve) to prevent the hair from penetrating into the head.

So do all the collide spheres for all the curves and...

You should get something like this.
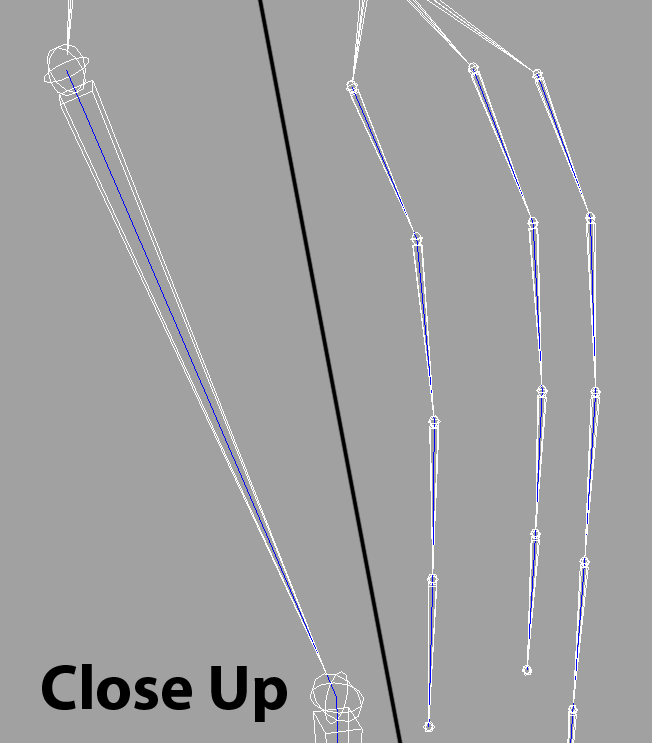
You can also create multiple collision spheres/cubes for one curve, like I did above.

Parent the constraints under the master joint (or any control in the rig that controls the master joint) because you want the collide spheres to move with the head and not stay there when the head moves.

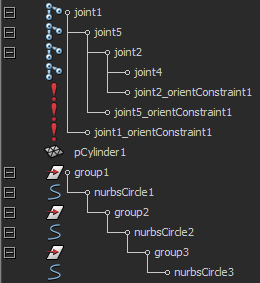
I made a controller and a head joint (supposedly I followed how I would have rigged a full character [but then again the mesh is pass the origin on the negative side {for tutorial purposes only}]. I have provided a full expansion view of my outliner, just for you to check and if you have any questions, you may comment or send me a mail.


Your final result, without messing around with the hairSystem would be something like this:


As you can see, the hair is pretty crazy, we would not want them to fling about when the character is being animated (please take note that, I did not create this in scale, also I do not think that correct scale is required).

I will be talking about the hairSystem settings and attributes (the ones which are of more importance).

Dynamics tab in the hairSystem
(I will not talk about the clump and hair shape tab)

#1 Iterations
Iterations controls the repetitions per time step of the hair solver, the higher the value, the more the hairSystem will calculate on the stiffness and the length flex, increasing accuracy and the cost of the simulation.

#2 Length Flex
Basically how much the hair curve can stretch along its length.

#3 Stiffness
Well, as the name suggests, it controls whether the hair curve is flexible or not.

#3.5 Stiffness Scale
Left to right: root of hair to tip of hair (start of hair curve to end of hair curve)
Down to up: not stiff to stiff

#4 Forces tab


I will not elaborate a lot here, since the most important one that I feel is the mass. The other settings, you can go to the help section of Maya itself and search "hairSystemShape" without the open inverted commas.

#4.5 Mass
Mass defines the mass (amount of matter in the hair), or if you want (although not scientifically equal), the weight of the hair.

That kind of sums up what I use overall. There are some attributes that you want to explore, those are fine even if it is in its default values.

Collisions and Turbulence is worth checking out.
After changing the settings on both the hairSystem, this is the final result that I have got:


I might be doing an extra tutorial continuing this one (like an extra part) talking about FK-ing this hair after being simulated to allow more control over the hair for animators.

You can get my working file here:

https://www.dropbox.com/s/2fph496gk6r1tqz/dynHairTut.ma

Please be reminded that this file is for learning purposes and is not to be abused in any matter, if you want to share or improve on it, just a credit will do, thanks.

If you have any questions, you can leave a comment or you can send an e-mail to me. Thank you for your audience.

Monday, 2 December 2013

Dynamic Hair Tutorial Part 2 (Dynamic connections)

Welcome to the second part of the dynamic hair tutorial, by me, if you have not checked out part one of the tutorial, check it out here: PART 1

In part 1, we have gone through setting up the mesh needed (skinned to joints) for a dynamic hair simulation, and also went through the setting up of curves for the dynamic hair system.

In this part 2, we are going to do some connections, connecting the curves and joints and the mesh all together step by step. From here onwards I will be addressing the curves you have created in the first tutorial as inputCurves.

To start off, load up your file (if you have closed it) and check that you have the following items from the previous tutorial:

Mesh (model/object)
Joint chain (skinned to mesh)
Hair follicles
inputCurves (child of their respective hair follicles)
Output hair curves (not the same as the original curves)
Hair systems

*hint* You can check the uploaded picture in the previous tutorial. *hint*

Next, isolate ([shift + I] or hide the rest [shift + H]) the joint chain and the output curves.

Isolation mode, the whole joint chain and all the output curves.
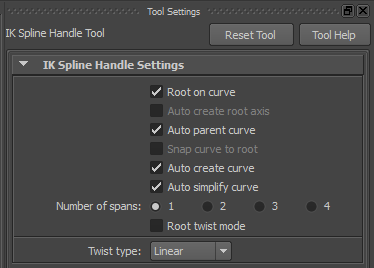
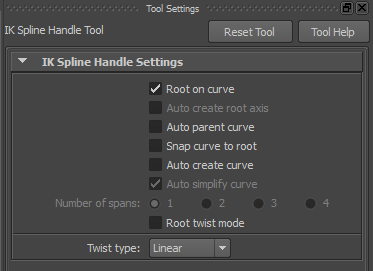
What you are getting ready to do is to IK spline the joints with the curves that are already made. Check the tools settings of the IK Spline tool located at:

Animation tab>Skeleton>IK Spline Handle Tool (option box)

Default settings.
Set it like so:
The settings needed.

We do not want the curves to be auto parented to the joints they are in because that might cause it to become missing in the rig, we want it outside anything; in its own group. We also want to check the "Auto create curve" OFF, because we want the joints to be driven by the dynamic output curves we created a while back.

Now you have your tool set up, time to IK Spline those joints.

Click on the first joint once the tool has been activated (you will see something like a cross hair)
Next, click on the curve that runs along that joint chain.
Lastly, click on the last joint of the same joint chain (must be at the place where the last curve point is).
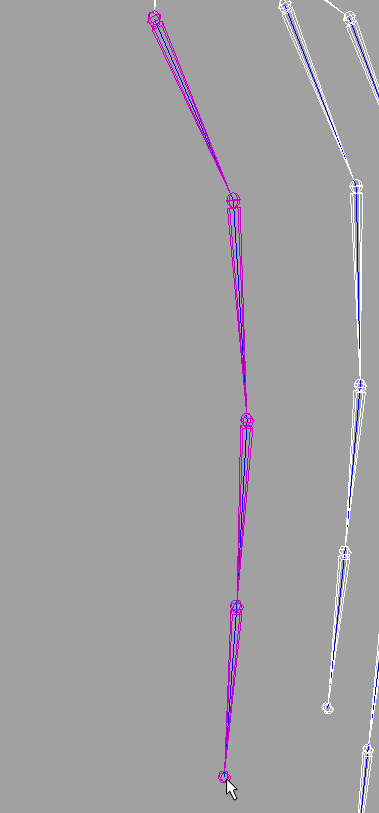
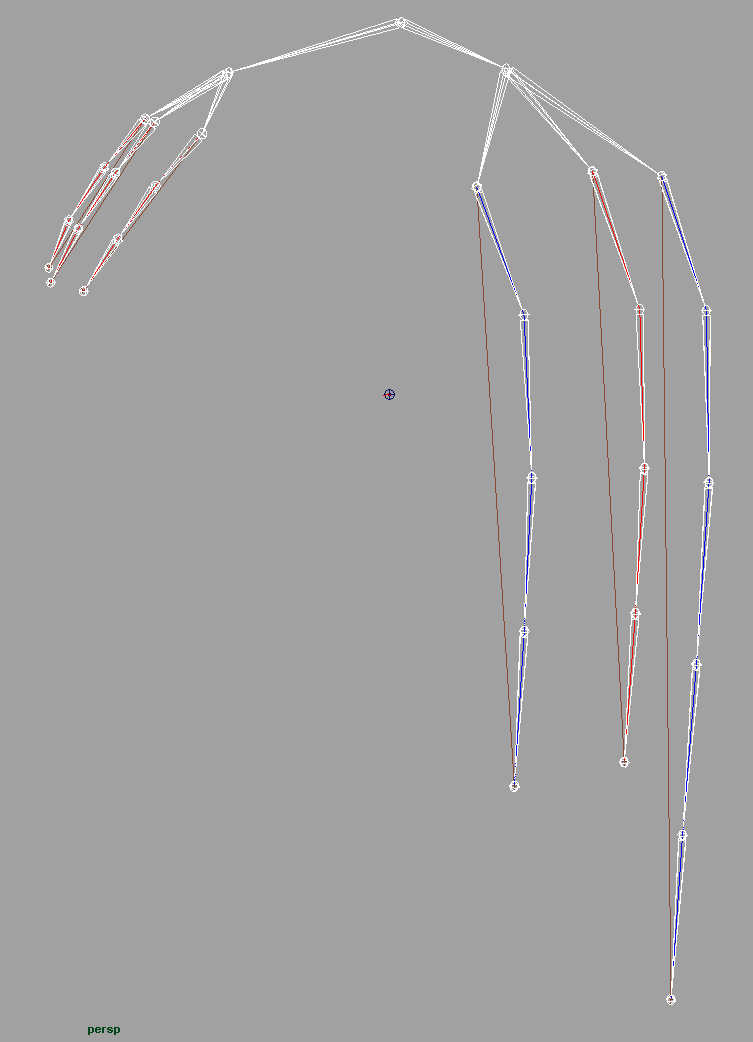
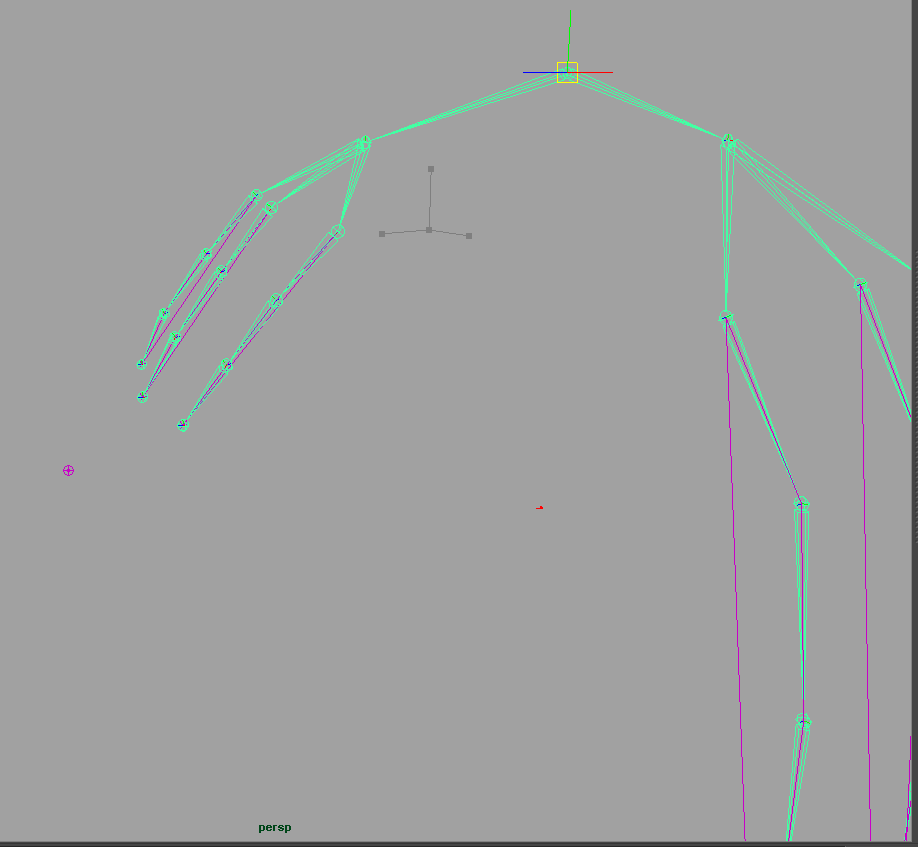
Do this for the rest of the joint chains and you will get the following results, the brown lines are the IK Spline and the cross at the ends of each joint chain are its handles.

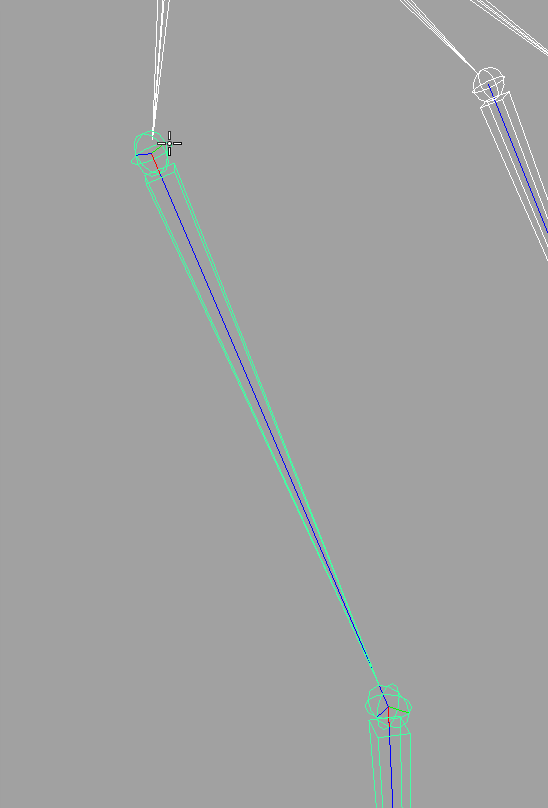
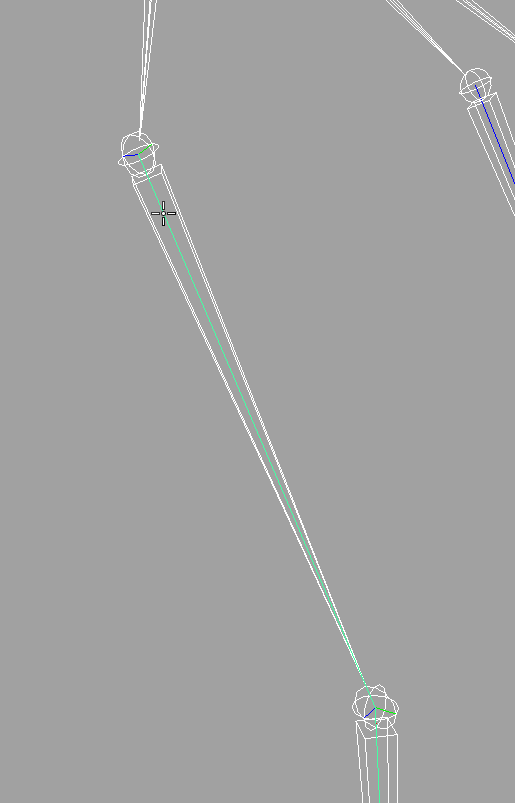
Do not worry about the blue and the red lines inside the joint chain here, those are merely the inputCurves and the output curves overlapping each other.
At this time, your hair is now able to move dynamically, however, if you try to do it, you might destroy your hair rig.

There are actually a few settings to set before you can have it flow with a master control. You can just press the "play" button but you will not see much happening. Truth be told you are just 70% done.

In case you do not know how it looks like, it is situated at the bottom right corner of the whole Maya interface by default.
Be mindful this is not Interactive Playback, so you cannot move anything while the time slider is playing.
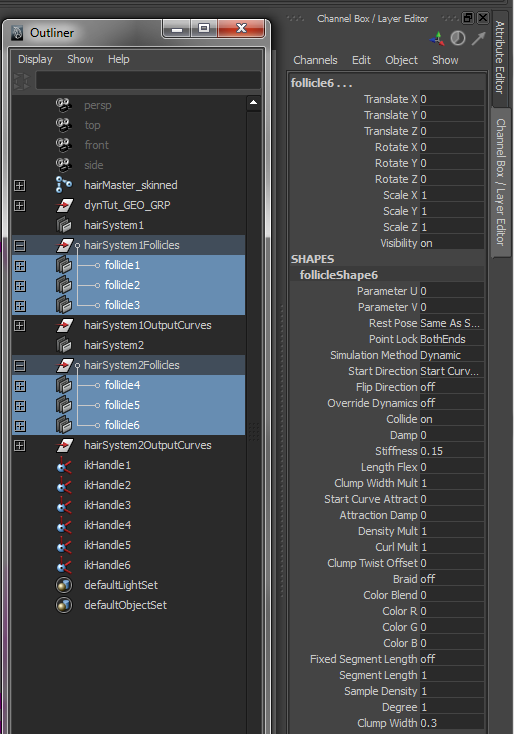
First thing to set is the "point lock" attributes on all the follicles, either one by one in the attribute editor or do it like me, on the channel box on the right side.

"point lock" attribute is fourth (4th) from the top of the follicleShape.

Set it to base, by having done so, it means that the base (starting point of your inputCurve when you created it, which is also the start of your hair joint chain) is locked in place and will be acting like a pinned point while the rest of the points on the curve swing about freely.


Now if you zoom in close enough, you can see that the hair joints are already moving a little bit at the ends. In the next section I will be guiding you on how to integrate the hair system components (hairSystem, outputCurves, follicles and their inputCurves) into the master joint of the joint chain.

First thing you realise, when you want to move the master joint of the chain, this happens:

The individual hair joint chains do not move and you might destroy the rig if you do not place the joint you moved back.
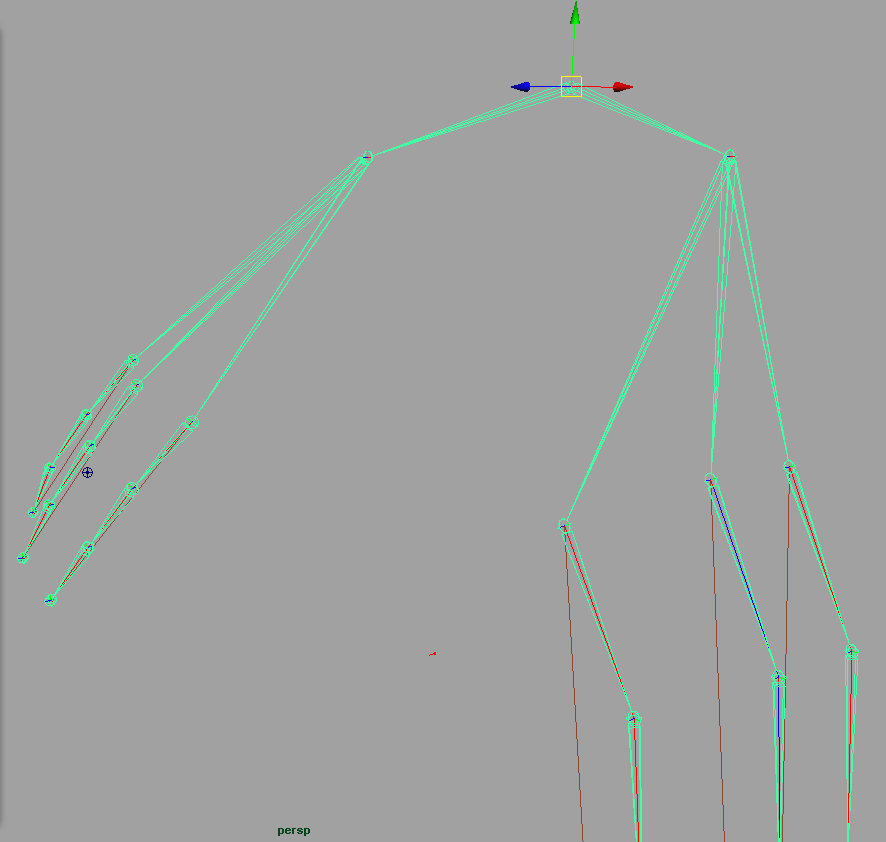
Basically, you can never move the joints which are part of the IK Spline, because the whole chain is controlled by the IK Spline's curve, your inputCurve. Thus, you have to let the joint above the hair strands joint chains control the follicles with the inputCurves. Try it now and you should get a different and more favourable result.

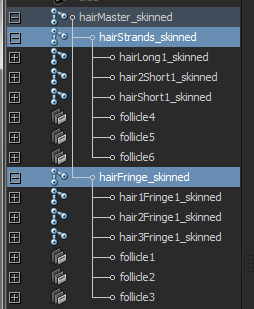
Follicles under their direct parent joints.

Now it can be moved when the master joint is moved.
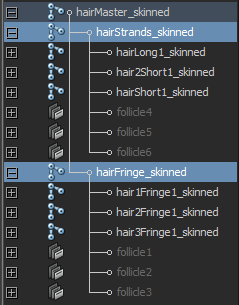
Now that the follicles are placed correctly, you can hide them along with the inputCurves.

Select the follicles and [shift + H] to hide the things you selected.
The hidden follicles will look like that in the Outliner when hidden.
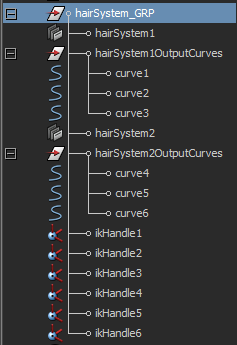
You can delete the groups where the follicles originate from since they are empty, you may wish to group all the IK handles from the IK Splines, the hairSystem and the output curves into a group, just to keep the Outliner clean.

So your Outliner will not be cluttered with a lot of things.

YOU ARE DONE!!
(well not really)

Your result should look like the following when in Interactive Playback:


However, if you have noticed, the hair mesh is penetrating the "head", I will go through the collision methods to have the hair not penetrating the head and I will go through setting up the hairSystem node in the next part.

Click here for Part 3

If you have any questions, you can leave a comment or you can send an e-mail to me. Thank you for your audience.